Kitchen Re-do on a Budget

Small kitchen organization

When my realtor and I walked through the door of my current home for the first time, it became a contender right away. Then we went into the kitchen and…wait…what?! Kitchens are supposed to sell houses, but not this time. The kitchen was very 80’s, and very brown. Floors, cabinets, doors, trim and counter tops—all brown. It was so sad and dreary. I wasn’t too concerned because I knew a gallon of white paint on the cabinets would perk the space right up. But I didn’t realize how inefficient the kitchen actually was until after I moved in.

My kitchen is small. I can handle small. And at this stage of my life, I’m happy to report I actually prefer small. But I can’t handle disorganization and poor use of space. After a handful of projects that I’ll share with you here, I gained a functional, charming little kitchen for not a whole lot of money. Here’s the completed project.

Kitchen Re-do On a Budget/HomeStagingBloomingtonIL.wordpress.com

I wanted to keep as much of the existing kitchen as I could, and since the previous owners had just updated the counter tops, I decided to keep them. I also decided to keep and alter the majority of the lower cabinets.

Plan A was to try to find new white upper cabinets in the same style as my existing lowers, so I would only have to paint the lower kitchen cabinets. I wanted to replace the majority of the uppers in order to upgrade from 30″ cabinets to 42″. I managed to find a kitchen design center that carried cabinets that were a very close match to the existing base cabinets I wanted to keep. Unfortunately, they were only available in stained oak. Plan B—order brand new stained cabinets and paint the whole darn kitchen white.

While waiting for the new cabinets to arrive, I had several projects to tackle, one of which was filling the grain and painting the existing cabinets (See how here.). See what I mean about the dreary brown?

  Kitchen Re-do On a Budget/HomeStagingBloomigtonIL.wordpress.com

Things are looking a little brighter!

  Kitchen Re-do On a Budget/HomeStagingBloomigtonIL.wordpress.com

At this point, it just felt good to get the ball rolling.

  Kitchen Re-do On a Budget/HomeStagingBloomigtonIL.wordpress.com

Here’s a before photo of the other side of the kitchen.

  Kitchen Re-do On a Budget/HomeStagingBloomigtonIL.wordpress.com

Baby steps!

 Kitchen Re-do On a Budget/HomeStagingBloomigtonIL.wordpress.com

Another project was to beef up the “wood” peninsula. What a difference this made!
See details here.

  Kitchen Re-do On a Budget/HomeStagingBloomigtonIL.wordpress.com

  Kitchen Re-do On a Budget/HomeStagingBloomigtonIL.wordpress.com

  Kitchen Re-do On a Budget/HomeStagingBloomigtonIL.wordpress.com

Next to the stove, was a corner cabinet that had a very small door opening, but lots of space inside. I made the opening bigger by replacing the board to the left of the door with a smaller one. Then I made some pull out drawers for storage using the rolling hardware from some of the cabinets I removed, and from some scrap wood I had on hand. Gotta love free. I built a small shelf unit that tucked back inside the cabinet next to the drawers for storing seldom-used items. See that project here.

  Kitchen Re-do On a Budget/HomeStagingBloomigtonIL.wordpress.com

  Kitchen Re-do On a Budget/HomeStagingBloomigtonIL.wordpress.com

  Kitchen Re-do On a Budget/HomeStagingBloomigtonIL.wordpress.com

Once my cabinets arrived, the fun began! Many of the photos you’re going to see, will be before (old oak), during (new oak), and after (oak painted white).

First, I had the base cabinet next to the fridge swapped out for one with drawers. Drawers instead of doors are a much more efficient way to go. No more digging for pots and pans!

  Kitchen Re-do On a Budget/HomeStagingBloomigtonIL.wordpress.com

Here’s a picture of the “new” cabinet before painting.

  Kitchen Re-do On a Budget/HomeStagingBloomigtonIL.wordpress.com

And here’s the same cabinet painted and with hardware installed.

 Kitchen Re-do On a Budget/HomeStagingBloomigtonIL.wordpress.com

Ditto to the left of the stove—I had a base cabinet installed that had drawers instead of a door—and went from a tiny 12″ cabinet to a less-tiny 15″ cabinet. I don’t understand why a 12″ cabinet was put into a space big enough for a 15″ cabinet, but no matter. Since the old 12″ counter top was then too small for the new 15″ cabinet, I had my awesome carpenter brother, Mike cut down the counter top from the cabinet in the last photo to fit this one. I trimmed out this cabinet the same way I trimmed out the peninsula.

  Kitchen Re-do On a Budget/HomeStagingBloomigtonIL.wordpress.com

 Kitchen Re-do On a Budget/HomeStagingBloomigtonIL.wordpress.com

Another issue I had with trying to match the new cabinets to the originals was the change in hinges. My existing lower cabinets had visible hinges, and the new upper cabinets had hidden (Euro) hinges. That lead to another project of learning how to install hidden hinges. See how I did that here.

You can see the shiny hinges in the next photo, that I painted white in the second photo. But after my brother showed me the ropes on how to drill the cabinets for hidden hinges, I was able to get rid of the visible ones. After that, there was virtually no way to tell the new cabinets from the old ones. The last photo in this group of three was after the new hinges were installed. I opted for the soft-close hidden hinges, so no more slamming cabinet doors!

 Kitchen Re-do On a Budget/HomeStagingBloomingtonIL.wordpress.com

Kitchen Re-do On a Budget/HomeStagingBloomingtonIL.wordpress.com

Kitchen Re-do On a Budget/HomeStagingBloomingtonIL.wordpress.com

One of the first things I did to the upper cabinets was to ditch the decorative piece that ran in front of the window between the tops of my two upper cabinets. That opened things up right away. (You can see the piece I’m referring to in the next photo.) Bigger kitchens can handle those pieces, but in my kitchen, it’s just clutter. Be gone!

 Kitchen Re-do On a Budget/HomeStagingBloomingtonIL.wordpress.com

In order to use all the available space in my small kitchen, I decided to swap out the 30″ upper cabinets with 42″ cabinets. I was grateful that I didn’t have dry-walled soffits to contend with. I also ordered cabinets without those pesky stiles in the way. The easiest upper cabinet swap was the free-standing one in the next photo.

I had planned to install these cabinets myself, because I’d hung a few 30″ cabinets in a laundry room in a previous house myself without any trouble. But after seeing how massive a few of these cabinets were, I knew it was something I wouldn’t be able to do on my own. Little brother to the rescue…

Look at the difference between the puny original cabinets on the left and one of the new, taller cabinets on the right in the next photo.

 Kitchen Re-do On a Budget/HomeStagingBloomingtonIL.wordpress.com

So here’s the old cabinet.

Kitchen Re-do On a Budget/HomeStagingBloomingtonIL.wordpress.com

Here’s the replacement cabinet before painting.

 Kitchen Re-do On a Budget/HomeStagingBloomingtonIL.wordpress.com

And here it is painted out.

 Kitchen Re-do On a Budget/HomeStagingBloomingtonIL.wordpress.com

Next came the tiny cabinet over the fridge. It was replaced with one that was much larger than the old one.

Kitchen Re-do On a Budget/HomeStagingBloomingtonIL.wordpress.com

 Kitchen Re-do On a Budget/HomeStagingBloomingtonIL.wordpress.com

On my “to do” list is to build a divider of some sort to go inside this cabinet.

 Kitchen Re-do On a Budget/HomeStagingBloomingtonIL.wordpress.com

To the right of the fridge was this funky, mis-matched, cabinet-stacking wonder that I replaced with an open-shelving unit that I built to accommodate my everyday dishes. I made the counter top from wood I found curbside. The original counter top was the one we cut down and sacrificed for the cabinet to the left of the stove. See the open-shelving project here.

 Kitchen Re-do On a Budget/HomeStagingBloomingtonIL.wordpress.com

Kitchen Re-do On a Budget/HomeStagingBloomingtonIL.wordpress.com

Kitchen Re-do On a Budget/HomeStagingBloomingtonIL.wordpress.com

Now for the microwave/stove area. This took a lot of thought. This area was horribly inefficient. The cabinet to the right of the microwave had a door with only a 7″ opening. Not many kitchen items can fit into a 7″ opening, and there was a lot of blind storage space inside of that cabinet that I’d deemed unusable. I think this one was the winner for the worst cabinet in the kitchen.

Before…

 Kitchen Re-do On a Budget/HomeStagingBloomingtonIL.wordpress.com

And after.

Kitchen Re-do On a Budget/HomeStagingBloomingtonIL.wordpress.com

The cabinet to the left of the microwave was only a 12″ cabinet and wasn’t much better than that last one, and was also replaced with a 15″ cabinet.

 Kitchen Re-do On a Budget/HomeStagingBloomingtonIL.wordpress.com

 Kitchen Re-do On a Budget/HomeStagingBloomingtonIL.wordpress.com

The cabinet directly over the microwave was a bit of a mystery since there was a large filler strip underneath it that you can see in the photo below. By removing the filler strip and installing a cabinet that reached the ceiling, I gained a lot of extra storage space. This adjustment also raised the microwave a couple of inches which made for a bigger, brighter cooking surface on the stove top.

Here are before and after photos of that area.

 Kitchen Re-do On a Budget/HomeStagingBloomingtonIL.wordpress.com

 Kitchen Re-do On a Budget/HomeStagingBloomingtonIL.wordpress.com

I was then left with a 12″ space next to the cabinet to the right of the microwave that I filled with more open shelving. I made some corbels from scratch to support the shelves. The actual shelves were from the same curbside wood I used to make the counter top on the other side of the kitchen. It tied the two areas together nicely. See how I made the corbels and installed the shelving here.

 Kitchen Re-do On a Budget/HomeStagingBloomingtonIL.wordpress.com

 Kitchen Re-do On a Budget/HomeStagingBloomingtonIL.wordpress.com

Kitchen Re-do On a Budget/HomeStagingBloomingtonIL.wordpress.com

I used the same wide beadboard on the wall behind the corbel open shelving that I used on the back of the open shelving next to the fridge to further tie those two areas together.

Of course you can’t have a kitchen re-do without new hardware. So pretty!

 Kitchen Re-do On a Budget/HomeStagingBloomingtonIL.wordpress.com

 Kitchen Re-do On a Budget/HomeStagingBloomingtonIL.wordpress.com

Another project that helped this kitchen function better was a very DIY-friendly pantry door spice rack. See how to make one for yourself here.

 Kitchen Re-do On a Budget/HomeStagingBloomingtonIL.wordpress.com

 Kitchen Re-do On a Budget/HomeStagingBloomingtonIL.wordpress.com

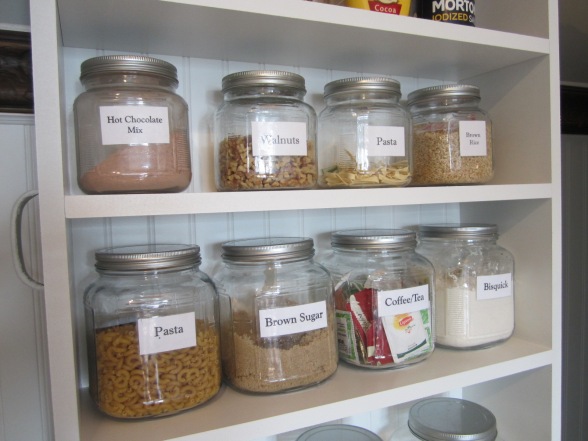
I also added extra shelving inside the pantry so no space was wasted. I painted the shelves a crisp white, and what a difference! I swapped out the door, door casing and baseboard. I also permanently removed the door you see on the far right that leads to the laundry room. The two doors were constantly banging into each other. Note that the original pantry had only four shelves.

 Kitchen Re-do On a Budget/HomeStagingBloomingtonIL.wordpress.com

I added three additional shelves, but kept them shallow so items in the back are still easy to see and reach. I removed all of the original shelves and spaced them differently. I lowered the top shelf so there would be enough clearance for cereal boxes. The original bottom shelf was so high off the floor, that there was a lot of unused space in that area so I lowered that one as well. The second shelf from the bottom in the photo below, I made to be U-shaped to wrap around the side walls for easy access to my glass canisters.

 Kitchen Re-do On a Budget/HomeStagingBloomingtonIL.wordpress.com

I like to put the ends of my cabinets to work too. Here, I used one such area for cutting board storage, and love that they’re easily accessible.

 Kitchen Re-do On a Budget/HomeStagingBloomingtonILjpg.wordpress.com

It’s all in the details. We hear it all the time, and I’m a believer. Here are photos of the trim I added to the bottom of the cabinets. And I do these types of projects the old-fashioned way—a hammer, nails and a nail set/punch.

 Kitchen Re-do On a Budget/HomeStagingBloomingtonIL.wordpress.com

 Kitchen Re-do On a Budget/HomeStagingBloomingtonIL.wordpress.com

I went with a small crown molding (1.5″) since I swapped out my existing 30″ upper cabinets for 42″ ones. If I had used a larger crown, it would have dropped my cabinets too low, and the space between the counter tops and the bottom of the cabinets would have been too small. I give my brother all the credit here for the crown molding installation. I added a few pieces of crown after he left, and I must say, it wasn’t as easy as he said it was!

Kitchen Re-do On a Budget/HomeStagingBloomingtonIL.wordpress.com

 Kitchen Re-do On a Budget/HomeStagingBloomingtonIL.wordpress.com

And about that crown…I couldn’t find much information on the internet about the use of crown molding with 42″ cabinets, and I agonized over whether or not to do it. Unless you’ve got something tall that you must display on your counter top, there’s no reason why you can’t have a modest crown with 42″ cabinets. The space between my counter top and the bottom of my cabinets is just shy of 17″ instead of the “standard” 18, and I would do it again in a heartbeat. So if you’re contemplating whether or not to do this, I say go for it!

They do make a 36″ cabinet that allows for larger crown molding, but I wanted all the storage space I could get. And since my kitchen is small, I felt a more modest crown molding was appropriate anyway.

I decided to add some wall-frame wainscoting, some beadboard, a chair rail and a picture rail to the small, adjacent dining area. The trim I had already added to the bottom of the upper cabinets established the chair rail height. I hooked onto it using the same trim, and continued it onto the wall. I also continued the crown from the cabinets across this wall, but added an additional piece underneath the crown to make it a bit more substantial.

I marked out my master plan with painter’s tape so I would have an idea of what it would look like first. See how to install wall frame wainscoting here.

 Kitchen Re-do On a Budget/HomeStagingBloomingtonIL.wordpress.com

Kitchen Re-do On a Budget/HomeStagingBloomingtonIL.wordpress.com

Wainscoting Ideas/HomeStagingBloomingtonIL.wordpress.com

And here are a couple of close ups of the wainscoting/beadboard/picture rail.

 Kitchen Re-do On a Budget/HomeStagingBloomingtonIL.wordpress.com

 Kitchen Re-do On a Budget/HomeStagingBloomingtonIL.wordpress.com

I’m hoping to eventually find some wallpaper to put in the area above the picture rail. I painted a subtle stencil in that area for the time being.

 Kitchen Re-do On a Budget/HomeStagingBloomingtonIL.wordpress.com

To finish off the dining area, I decided to use a table that I found on a curb several years ago. Yes, ladies and gentleman, someone actually left this amazing table in pieces on a curb and threw a mattress over the top of it! But I found it. Ha! I gave away my store-bought table that I spent good money on, and decided to use my found treasure instead. A little white paint gave it some extra charm.

 Kitchen Re-do On a Budget/HomeStagingBloomingtonIL.wordpress.com

I discovered the chairs at a thrift shop, and they begged me like little lost puppies at a shelter to take them home. How could I refuse? I added a nice, thick cushion to them and re-covered them with some gorgeous fabric that my sis, Dee, discovered at Hobby Lobby. Here’s what the chairs looked like when I bought them.

 Kitchen Re-do On a Budget/HomeStagingBloomingtonIL.wordpress.com

And here’s a newly covered chair.

 Kitchen Re-do On a Budget/HomeStagingBloomingtonIL.wordpress.com

Now for some before and after photos.

 Kitchen Re-do On a Budget/HomeStagingBloomingtonIL.wordpress.com

 Kitchen Re-do On a Budget/HomeStagingBloomingtonIL.wordpress.com

 Kitchen Re-do On a Budget/HomeStagingBloomingtonIL.wordpress.com

 Kitchen Re-do On a Budget/HomeStagingBloomingtonIL.wordpress.com

Kitchen Re-do On a Budget/HomeStagingBloomingtonIL.wordpress.com

 Kitchen Re-do On a Budget/HomeStagingBloomingtonIL.wordpress.com

 Kitchen Re-do On a Budget/HomeStagingBloomingtonIL.wordpress.com

Kitchen Re-do On a Budget/ HomeStagingBloomingtonIL.wordpress.com

 Kitchen Re-do On a Budget/HomeStagingBloomingtonIL.wordpress.com

Kitchen Re-do On a Budget/HomeStagingBloomingtonIL.wordpress.com

This kitchen re-do was under $2000 (not including appliances and the new kitchen window), and the original cabinets I removed from the kitchen, were painted and used in my laundry room makeover–another post yet to come. So that $2000 actually transformed two rooms in my house.

I looked into getting a whole new kitchen, but I knew I would be just as happy with a more creative, less expensive approach that I could do myself…mostly. Nothing in this kitchen is high end. Nothing is fancy or trendy. It’s just simple, clean and beautiful. I got the bright, white kitchen I love, more storage and much better function on a small budget.

This post was written by Tracy Evans who is a Journeyman Painter and Certified Home Stager/Redesigner. If you enjoy gardening, you may want to visit her gardening blog at MyUrbanGardenOasis.Wordpress.com.

Kitchen Open Shelving

DIY Kitchen Open Shelving

An area of my kitchen was in need of a makeover, thanks to the “resourcefulness” of one of my home’s previous owners. It looked as if they’d had one of those seemed-like-a-good-idea-at-the-time moments while attempting to add some additional storage space. Their creation was one that made me stand and stare for a moment while thinking, “Hmm. Really?”

That’s the same reaction most visitors had when seeing my kitchen for the first time. It amused me to watch the the “Hmm. Really?” look wash over their faces when they rounded the corner and saw it. The “it” was two mis-matched cabinets—one stuck to the underside of the other—in an area next to the fridge. Here it is. Now you can have the “look” too.

Kitchen Open Shelving/HomeStagingBloomingtonIL

I’m guessing a previous owner saw the “cabinet-stack” as a quick and easy storage solution. While I do respect their creativity and agree that the idea wasn’t all that bad, there were some obvious problems. The door styles didn’t match, the cabinets were made from two different types of wood, the stain colors didn’t match and one cabinet had exposed hinges, and the other had hidden hinges. And the doors were crooked. Yikes. It all had to go.

 Kitchen Open Shelving/HomeStagingBloomingtonIL

Since my kitchen is small, it was important to make the best possible use of space, and custom open shelving was the way to go. First, I must say that there should be a kitchen law that states any builder who installs 30″ upper cabinets (that don’t go all the way to the ceiling) in their kitchens should be thrown in the slammer. Upon release, they should be required to register as a kitchen offender. Thirty-inch cabinets in small kitchens are a bad idea because instead of storage, that full foot of unused open space above the cabinets is reduced to a dust-catcher.

I’ve heard the argument that an average-height person can’t reach the top shelf of a 42″ cabinet. There’s this thing called a step stool, and I’ll gladly use one in order to have a place to put seldom-used, but vital kitchen items like my waffle iron and my ice bucket that hasn’t been used since 1995. Needless to say, I was going all the way to the ceiling with my shelving unit.

Basically, I built a bookcase without a bottom shelf because I wanted the area to look “hutchy”. I agonized over how deep to make it. After all, this was my big chance to gain some extra inches, but I didn’t want the shelves so deep that it would look odd. I was trying to rid this kitchen of odd, after all. I decided to make the shelves 16″ deep, so I gained four inches of depth per shelf over the 12″ deep cabinets that were there previously. Here’s the shell assembled and painted.

 Kitchen Open Shelving/HomeStagingBloomingtonIL

The beauty in all of this is I was able to space the shelves to accommodate my personal stacks of plates, the height of my drinking glasses and the size of my mixing bowls that I planned to display.

I added beadboard backing for interest, but it also helped me to keep the project square.  I drove nails through the back of the beadboard and into each shelf to give added support so the shelves wouldn’t warp over time. I built the unit with 3/4″ plywood that was cut to size for me at Lowe’s. I made it about a half-inch smaller than the opening to allow for any wonkiness in the walls. Even so, it had to be “persuaded” into its new home, and was then attached to the studs in the wall behind it.

Since I knew I’d be sliding dishes across the shelves, I decided to use laminated shelving rather than painted plywood. That turned out to be a good decision. I’ll never have to re-paint the shelves or worry about paint scratching or rubbing off onto my glassware. Plus I have a bad habit of putting away dishes when they’re still wet. Not a problem with laminate!

I had a nicely-shaped piece of routed trim that was given to me by neighbors who knew I hoarded that sort of thing, so I used it to trim out the top of my shelves. My super-talented carpenter brother, Mike, cut it down to size for me. He removed the excess from the middle of the piece since both ends were tapered, and then used my Kreg Jig to join the two pieces back together. You can’t even tell he altered it. Genius.

 Kitchen Open Shelving/HomeStagingBloomingtonIL

 Kitchen Open Shelving/HomeStagingBloomingtonIL

Small kitchen. Small crown. I used a modest 2.5″ crown molding in addition to the very, very red trim piece (thank goodness for quality primer) for trimming out the upper part of the unit. It was the perfect size, and added presence without going overboard. I gotta be honest. My bro installed the majority of the crown molding in my kitchen. A carpenter I know (could’ve been my brother) said it’s not difficult to install. I disagree. Completely. I installed a couple of pieces and I’m grateful to whoever invented caulk. That’s all I’m gonna say.

I added fluted trim to the vertical sides, and had some smaller trim added to the front edge of the shelves to cover the rough plywood edges. And there you have it!

Kitchen Open Shelving/HomeStagingBloomingtonIL

I had the base cabinet swapped out so I could have drawers instead of doors. It’s much more efficient for pots and pans. I also made a counter top out of some re-claimed wood (aka, wood I found and “claimed” from a curb). So a big thank you to whoever abandoned it, and I love the stain color you chose! Note the change in the counter top in the next two photos.

Kitchen Open Shelving/HomeStagingBloomingtonIL

Kitchen Open Shelving/HomeStagingBloomingtonIL

I had to wait a few months for the back-ordered drawer pulls, but it was worth the wait. Love them!

Kitchen Open Shelving/HomeStagingBloomingtonIL

Now for the before and after photos. Note in the first “before” photo, that my silverware was stored on top of the counter. It lived there for a full year because the two small drawers in the original base cabinet weren’t wide enough for my silverware divider. Now I have a big-girl silverware drawer!

Kitchen Open Shelving/HomeStagingBloomingtonIL

Kitchen Open Shelving/HomeStagingBloomingtonIL

In the next two photos, you can see how the empty space above the cabinets went from dust-catcher to display space. So much better. I also swapped out the cabinet over the refrigerator with a deeper one.

Kitchen Open Shelving/HomeStagingBloomingtonIL

Kitchen Open Shelving/HomeStagingBloomingtonIL

Check out the charming penguin wine glasses in the next photo. They were purchased at a thrift store here in Central Illinois called “Two Sisters and a Warehouse”. A dear friend owns the shop that’s full of unique treasures. For more information, check out their website at www.TwoSistersAndAWarehouse.com.

Kitchen Open Shelving/HomeStagingBloomingtonIL

 Kitchen Open Shelving/HomeStagingBloomingtonIL

 Kitchen Open Shelving/HomeStagingBloomingtonIL

Here’s the whole area before and after. I changed out my door casing, baseboards, doors and door hardware, and swapped out my refrigerator for a stainless steel one.

 Kitchen Open Shelving/HomeStagingBloomingtonIL

 Kitchen Open Shelving/HomeStagingBloomingtonIL

I love being able to store my dishes within easy reach, and love that this shelving unit holds much more than any standard cabinet would have. It also cost a lot less than buying something manufactured. I’m also happier with my lighter, brighter kitchen.

 Kitchen Open Shelving/HomeStagingBloomingtonIL

More about the full kitchen remodel later!

This post was written by Tracy Evans who is a Journeyman Painter and Certified Home Stager/Redesigner. If you enjoy gardening, you may want to visit her gardening blog at MyUrbanGardenOasis.Wordpress.com.

DIY Corbels for Open Shelving

DIY corbel for kitchen open shelving

There’s something to be said for the ease of open shelving. It’s almost soothing to be able to see the familiar dishes you love, displayed in such a relaxed way. And I can vouch for the fact that storing dishes on open shelving makes unloading the dishwasher a smidge less painful. Just a smidge.

In a mini-makeover of my kitchen, I chose to fill two separate areas with open shelving. Not only are those areas now more visually appealing and more functional than if I had installed cabinetry, but they were also a less expensive option. One of the areas was done using corbels I made from scratch. Here’s the result.

 DIY Corbels for Open Shelving/HomeStagingBloomingtonIL.wordpress.com

Prior to this project, I’d been collecting photos of corbels from Pinterest that I thought I might be able to duplicate. One blogger’s corbels in particular, (Pretty Handy Girl) were an immediate favorite. And God Bless her for providing a pattern on her site. I stretched and altered her pattern to fit the dimensions I needed with the help of my genius son Ross, and “Snipping Tool” on my computer.

DIY Corbels for Open Shelving/HomeStagingBloommingtonIL.wordpress.com

I used graphite paper to transfer the pattern onto wood. Graphite paper resembles black tissue-paper, but has graphite on one side. I placed it between the pattern and the wood, and then traced over it with a painting stylus to transfer the design. (I had two different patterns going on here in the next few photos for those of you who are super-observant.)

 DIY Corbels for Open Shelving/HomeStagingBloommingtonIL.wordpress.com

Here are the patterns traced onto the wood pieces. I used 1″ stock from my stash for the thinner, more intricate side pieces, and 2″ stock for the thicker, simpler center piece. My 2″ stock was reclaimed wood (aka found on a curb).

 DIY Corbels for Open Shelving/HomeStagingBloommingtonIL.wordpress.com

Here are the pieces cut around the perimeters.

 DIY Corbels for Open Shelving/HomeStagingBloommingtonIL.wordpress.com

I have a scroll saw that I use for intricate inside cuts like these, but I don’t see why this couldn’t be accomplished with a jig saw using a very thin blade.

Regardless of the saw, holes need to be drilled in the wood pieces for the interior cuts. I drilled a hole near each area where I would have to switch blade direction. You can’t drill too many holes! If you don’t drill enough holes, it will be painfully obvious that you needed more when you’ve run your blade into a spot that you can’t wiggle your way out of—sort of like painting yourself into a corner.

 DIY Corbels for Open Shelving/HomeStagingBloommingtonIL.wordpress.com

 DIY Corbels for Open Shelving/HomeStagingBloommingtonIL.wordpress.com

Now we’re getting somewhere.

 DIY Corbels for Open Shelving/HomeStagingBloommingtonIL.wordpress.com

 DIY Corbels for Open Shelving/HomeStagingBloommingtonIL.wordpress.com

Since I had decided on three shelves, with the bottom shelf being smaller in depth than the top two, I decided to make the corbels different too. I designed the next set of corbels by melding a few different lovelies that I’d seen and liked, and I followed the same steps with those.

 DIY Corbels for Open Shelving/HomeStagingBloommingtonIL.wordpress.com

 DIY Corbels for Open Shelving/HomeStagingBloommingtonIL.wordpress.com

Since I wanted the corbels to look old, I distressed them. Step one is to rough up the wood. Make sure you’ve done enough of that before you stain because if you do any heavy distressing after you stain, the fresh, unstained wood will show through on the sanded areas.

Light-colored wood peeking through your paint would be a dead giveaway that the corbels aren’t authentic. So not only would you be discovered (*blush*), but you would also have to break out the stain again, and touch up your “tip-off” spots. The stain should dry several hours or overnight before painting.

 DIY Corbels for Open Shelving/HomeStagingBloommingtonIL.wordpress.com

I also cut and stained pieces to put underneath and on top of the corbels.

 DIY Corbels for Open Shelving/HomeStagingBloommingtonIL.wordpress.com

I then glued and nailed the main corbel pieces together. I only used one nail on each side, setting the nails with a punch. Since these are supposed to be old pieces, I chose not to fill the nail holes.

 DIY Corbels for Open Shelving/HomeStagingBloommingtonIL.wordpress.com

 DIY Corbels for Open Shelving/HomeStagingBloommingtonIL.wordpress.com

I randomly brushed some gray and some blue paint on the pieces because those were colors I wanted to show through the finish paint. They’re not all that attractive at this stage of the game.

 DIY Corbels for Open Shelving/HomeStagingBloommingtonIL.wordpress.com

I put a coat of white paint on next.

 DIY Corbels for Open Shelving/HomeStagingBloommingtonIL.wordpress.com

Since I wanted these to look like they had several layers of paint, I added some joint compound and after it was completely dry, I added another coat of white paint.

 DIY Corbels for Open Shelving/HomeStagingBloommingtonIL.wordpress.com

 DIY Corbels for Open Shelving/HomeStagingBloommingtonIL.wordpress.com

After letting the white paint dry overnight, I scraped some of the paint back off with the help of a heat gun. If you don’t let the paint dry enough, you’ll end up just smearing the paint as it melts rather than scraping it off as it softens.

I learned that the hard way so you don’t have to. Once you’ve smeared the paint by doing it too soon, you’re not going to be able to get back down to the stained wood because the wood absorbs the soft, melted mess that was once paint, and your stain will be forever buried.

 DIY Corbels for Open Shelving/HomeStagingBloommingtonIL.wordpress.com

 DIY Corbels for Open Shelving/HomeStagingBloommingtonIL.wordpress.com

Now for the install. After much deliberation, and a consultation with my super-smart carpenter brother, Mike, I conceded to the use of cleats. The studs were nowhere near where I needed them to be in order to install the corbels into them, so my only alternative was to screw cleats into the studs. Since these shelves were being installed in a corner, I took my cleats onto the adjacent wall for added stability.

I didn’t want to use cleats originally, but once I got them up, I was glad I did. Not only was it a piece-of-mind issue not having to worry about dishes and bottles of red wine and olive oil crashing to the floor, but cleats also fit the old cottage-style I love.

 DIY Corbels for Open Shelving/HomeStagingBloommingtonIL.wordpress.com

 DIY Corbels for Open Shelving/HomeStagingBloommingtonIL.wordpress.com

As always, I’m not suggesting this is the best way or the only way to do this, but it worked well for me. As of this writing, my shelves are still attached to the wall—a rousing success in my mind.

After attaching the cleats to the studs, I screwed the back pieces that sit behind the corbels to the wall, and screwed the corbel into the back piece. After using my Kreg Jig to make pocket holes in the tops of the corbels, I screwed the corbels into the cleats through pocket holes. These steps support the downward weight of the shelves.

 DIY Corbels for Open Shelving/HomeStagingBloommingtonIL.wordpress.com

 DIY Corbels for Open Shelving/HomeStagingBloommingtonIL.wordpress.com

I then made more pocket holes in the pieces that went on top of the corbels and screwed those into the cleats as well. Physics told me that attaching these pieces would prevent the corbels from tipping forward under the weight of objects placed in the area farthest from the wall.

 DIY Corbels for Open Shelving/HomeStagingBloommingtonIL.wordpress.com

 DIY Corbels for Open Shelving/HomeStagingBloommingtonIL.wordpress.com

Next, I added the shelves and screwed them from above into the cleats. The shelves were also curb finds, and the stain color was perfect.

 DIY Corbels for Open Shelving/HomeStagingBloommingtonIL.wordpress.com

I had to purchase some wood trim to cover up the edges of my shelves. As you can see in the next photo, the ends were pretty rough. The side trim I added was wider than the thickness of the shelves which made them look a little more substantial. See the difference?

 DIY Corbels for Open Shelving/HomeStagingBloommingtonIL.wordpress.com

 DIY Corbels for Open Shelving/HomeStagingBloommingtonIL.wordpress.com

I decided to hang the cutting board my son, Brandon, made for me years ago, between the two bottom corbels. I use it all the time, and hanging it here makes it easy to grab and keeps it off the counter. This photo was taken before I painted the walls.

 DIY Corbels for Open Shelving/HomeStagingBloomingtonIL.wordpress.com

Here’s what this corner of the kitchen looked like before. The blind cabinet to the right of the microwave had a door opening that was only 7″ wide. Not only was it hard to retrieve items stored back in the blind area, but its slim opening wouldn’t allow much to fit inside.

The blind cabinet with the 7″ opening was replaced with a 15″ wide cabinet that extends all the way to the ceiling, allowing for a lot more storage space. This left me with a 12″ space in the corner, and I felt open shelving was a lovely (and pretty much the only) option for this awkward space.

 DIY Corbels for Open Shelving/HomeStagingBloommingtonIL.wordpress.com

Here’s what the same corner looks like now. Once I decided on a paint color for my kitchen, I painted the cut-outs of the bottom set of corbels with the wall color.

 DIY Corbels for Open Shelving/HomeStagingBloomingtonIL.wordpress.com

These “after” photos were taken with a new camera that was a gift from my daughter, Sophie. Thank you, Sophie! I love, love, love my babies (even more than my shelves).

DIY Corbels for Open Shelving/HomeStagingBloomingtonIL.wordpress.com

As you can see, the shelves tuck back beside the adjacent cabinet. It’s usable space now, and is accessible where it wasn’t before.

 DIY Corbels for Open Shelving/HomeStagingBloomingtonIL.wordpress.com

DIY Corbels for Open Shelving/HomeStagingBloomingtonIL.wordpress.com

I love these shelves being next to the bright, sunny window.

 DIY Corbels for Open Shelving/HomeStagingBloomingtonIL.wordpress.com

So to recap, this project cost me around $15 for the whole sha-bang. I bought the trim pieces to trim out the ends of the shelving, and a 1 x 12 for the larger corbels. The rest was made with scrap wood I had on hand, or with some trash-turned-treasure wood that I found and rescued. The cabinets I removed were used in my laundry room remodel, so nothing was wasted. Now all of my kitchen space is accessible, and I’m a very happy girl!

This post was written by Tracy Evans who is a Journeyman Painter and Certified Home Stager /Redesigner. If you enjoy gardening, you may want to visit her gardening blog at MyUrbanGardenOasis.

How to Install Hidden Hinges on Cabinet Doors

Drilling for hidden hinges on cabinetry

“It’s all in the details.” We hear it all the time, and how true it is. We all know that one of those details that can give a boost to tired cabinetry is new hardware. But another way to update cabinets is to swap out visible hinges for hidden ones.

Hidden hinges, or European (Euro) hinges as they’re called, aren’t difficult to install, and were part of my mini kitchen update. My kitchen is small, and in order to gain storage space, I switched the 30″ upper cabinets to 42″ ones, but kept some of the existing base cabinets. The very shiny, visible hinges on the base cabinets were a dead giveaway as to which cabinets were the moldy oldies. Here are the originals.

 How to Install Hidden Hinges on Cabinet Doors/HomeStagingBloomingtonIL.wordpress.com

How to Install Hidden Hinges on Cabinet Doors/HomeStagingBloomingtonIL.wordpress.com

I mentioned to my super-smart carpenter brother, Mike, that I was wanting to update my hinges but was afraid of ruining my doors in the process.  I watched a YouTube video of DIYer who tried to install hidden hinges, and I’ll be polite and just say that the outcome was not a good one. Thus my fear. The place I ordered my new cabinets from couldn’t order replacement doors, so this was a one-shot deal.

My brother volunteered to investigate the world of hidden hinges for me since he was going to need to figure them out for a project he was working on too. I pretty much bought him every make and model of hidden hinge I could get my hands on, along with the hinge drill kit.

I gave him one of my old cabinet doors that I wasn’t going to be using, to experiment with. And of course, he figured it out. Here are the hinges from Home Depot I ended up using. There’s a big price savings per hinge if you purchase a 10-pack, by the way.

How to Install Hidden Hinges on Cabinet Doors/HomeStagingBloomingtonIL.wordpress.com

Hidden hinges also come in a soft-close style if you’re one of those people who want the latest and greatest. (Is it really that bad to hear a door close?) My new cabinets came with soft close hinges that I personally could take or leave.  I still find myself trying to shut them all the way instead of letting them do their thing. You might not want soft-close hinges if you’re the type who likes to slam things when irritated. (Just a thought.)

Here’s what comes with the kit to install the hinges–a special drill bit, a template and instructions that I didn’t have to read because my super-smart carpenter brother read them for me. You’ll want to be sure your cabinet door is thicker than this bit or you’ll end up like the YouTube guy.

 How to Install Hidden Hinges on Cabinet Doors/HomeStagingBloomingtonIL.wordpress.com

There are a couple of types of hidden hinges–ones for cabinets with face frames and ones for cabinets without face frames. My cabinets, which are from the late 80’s, have face frames.

There are also a couple of overlay sizes, most commonly  1 1/4″ and 1/2″. Overlay refers to the distance your door overlaps your opening. Mine didn’t measure 1 1/4″ or 1/2″, and this project still worked with my doors. If you’re looking for information on how to measure your overlay, this is not the post for you because I haven’t the faintest idea. Back to Google you go! (Sorry!)

That being said, buying every make and model turned out to be a good idea. I was pretty pumped when I installed my first door…until I shut the door and there was a gap the size of Kansas where the door didn’t cover my opening. I should have taken a picture because it was pretty hilarious-looking. Wrong hinge. So I removed the 1 1/4″ overlay hinge, installed the 1/2″ overlay and was good to go. The holes that need to be drilled in the door will be the same in size, depth and location regardless of your overlay measurement.

So here’s how this works. On the new cabinets I ordered, the center of the hinges were 4 1/2″ from the bottoms and the tops of the doors, so that’s the measurement I used for drilling on my old doors. The original hinges on the old cabinets were placed at about 3″ from the ends, so I didn’t have to worry about the old holes interfering with my new ones.

 How to Install Hidden Hinges on Cabinet Doors/HomeStagingBloomingtonIL.wordpress.com

My brother made me a better, more durable template from some clear plastic he had, so I chose to use his instead. It worked better with the bevel on my door’s edge.

 How to Install Hidden Hinges on Cabinet Doors/HomeStagingBloomingtonIL.wordpress.com

I drilled through the three holes in the template to create the necessary pilot holes, using tape on my drill bit as a guide so I wouldn’t drill all the way through the door.

How to Install Hidden Hinges on Cabinet Doors/HomeStagingBloomingtonIL.wordpress.com

I then lined up the pointed end of the bit with the center hole.

 How to Install Hidden Hinges on Cabinet Doors/HomeStagingBloomingtonIL.wordpress.com

Then I drilled and drilled. If your drill is a wimpy one, be prepared for this to take a minute…or five.  I realized what a difference a decent drill makes during this process as I had three different ones going–one with a bit to drill the pilot holes, one with the hinge bit and one to use as a screw gun for screwing the screws into the cabinet doors. If you have lots of doors to do, it might be a good idea to borrow a second and/or third one from a friend or you’ll spend lots of time playing musical bits. If you have multiple drills, use the most powerful one for the large hinge-drilling bit.

 How to Install Hidden Hinges on Cabinet Doors/HomeStagingBloomingtonIL.wordpress.com

I drilled until the top of the bit was flush with the surface of the cabinet. If you drill too deep, you may end up with a nice peep-hole in your door. That would be a bummer. If it’s not deep enough, the hinge will rock back and forth after you set it in the hole, and you’ll need to drill a little deeper.

 How to Install Hidden Hinges on Cabinet Doors/HomeStagingBloomingtonIL.wordpress.com

And yes, it’s messy!

 How to Install Hidden Hinges on Cabinet Doors/HomeStagingBloomingtonIL.wordpress.com

I thought it would be a great idea to just pick up the door and brush off the shavings into the garbage can. It was a great idea! Except I left one of the screws on the door which ended up in this sawdust abyss–never to be seen again.

How to Install Hidden Hinges on Cabinet Doors/HomeStagingBloomingtonIL.wordpress.com

Here’s the door all cleaned up. Looks like Swiss cheese. These cabinets obviously had more than one set of hinges over the years. I patched all the extra holes since I painted the cabinets white, and once the doors were painted they disappeared completely. If you have stained cabinets, you can fill the old holes with matching wood putty.

 How to Install Hidden Hinges on Cabinet Doors/HomeStagingBloomingtonIL.wordpress.com

The next step was to place the hinge in the hole and hope the pilot holes lined up. And they did.

How to Install Hidden Hinges on Cabinet Doors/HomeStagingBloomingtonIL.wordpress.com

The hinges came with these white tabs, but I chose not to use them. Since my cabinets are oak, I shouldn’t have any problems with the screws working themselves loose, but I’ll save them just in case.

 How to Install Hidden Hinges on Cabinet Doors/HomeStagingBloomingtonIL.wordpress.com

Next I screwed the hinge to the door with the two screws provided, and then I screwed the hinge to the face frame on the cabinet box that I had already painted white. The screw on the right in the set of three on the face frame is used to make adjustments to the door to make it sit level if it’s a little crooked after it’s installed.

 How to Install Hidden Hinges on Cabinet Doors/HomeStagingBloomingtonIL.wordpress.com

So let’s review, shall we? Here’s the original cabinet. Before…

How to Install Hidden Hinges on Cabinet Doors/HomeStagingBloomingtonIL.wordpress.com

Here’s what the cabinets looked like after they were painted, but before the new hinges were added. I temporarily sprayed the old hinges white until my brother got the hinge thing figured out. During…

 How to Install Hidden Hinges on Cabinet Doors/HomeStagingBloomingtonIL.wordpress.com

And here’s after the hidden hinges were added. Much better. Now you can’t tell the old cabinets from the new ones.

How to Install Hidden Hinges on Cabinet Doors/HomeStagingBloomingtonIL.wordpress.com

The doors look a little naked without their hardware that’s been back-ordered for two months now, but then again this post isn’t about cabinet handles and knobs, it’s about hinges.

Once I got over the fear of drilling into my cabinet doors, I realized it wasn’t difficult. You can always try this out on a piece of scrap wood the same thickness of your cabinets first. Or if you’re lucky enough to have a super-smart carpenter brother, maybe he could show you how. 🙂

This post was written by Tracy Evans who is a Journeyman Painter and Certified Home Stager /Redesigner. Feel free to visit her website at www.HelpAtHomeStaging.com to view more before and after pictures of her projects. And if you enjoy gardening, you may want to visit her gardening blog at MyUrbanGardenOasis.

How to Improve Access to Dead Kitchen Cabinet Space

DIY Pull-out drawers for kitchen cabinetry.

How could this happen? Who did this? The cabinet in my kitchen with the tiniest opening—a mere 7.5 inches wide—was the cabinet that had the largest amount of storage space inside of it. I’d like to speak with the person who designed my kitchen.

This post is the second in a series on how I’m improving my small, non-functional kitchen on a budget. Since I can’t afford a complete kitchen overhaul, I’m keeping the majority of my lower cabinets, but the runt of the litter recently underwent a little surgery, and that’s what this post is about. More specifically, I’m sharing how I made access easier to the large, dead-space corner cabinet in my kitchen.

Here’s what I started with. The cabinets are actually sturdy and in good shape so I’m keeping as many as is practical. They’re just not functional and not all that attractive. The 80’s are alive and well in my cabinets.

How to Improve Access to Dead Kitchen Cabinet Space/HomeStagingBloomingtonIL

You can see how much space is inside this cabinet, but the opening is so tiny that it’s difficult to fit anything in it. I had a mountain of stuff piled in there.

 How to Improve Access to Dead Kitchen Cabinet Space/HomeStagingBloomingtonIL

I wanted to cut out part of the board to the left of the opening to make it bigger, but I knew it would be impossible to make a nice cut with a jig saw–especially in oak. And my original plan was to then install a stationary shelf to put a basket on, and leave the cabinet open.

So I consulted my super-smart carpenter brother, Mike about my dilemma. He suggested removing that board entirely, cutting it down to a smaller size, and then replacing it with the factory cut edge showing.

You can see here that it’s a separate piece.

 How to Improve Access to Dead Kitchen Cabinet Space/HomeStagingBloomingtonIL

Here’s what the piece looked like from the inside of the cabinet.

 How to Improve Access to Dead Kitchen Cabinet Space/HomeStagingBloomingtonIL

He told me in order to remove the board, I’d have to hit it like a carpenter, not a painter (I just happen to be a painter). He said I’d have to hit it hard. Real hard. So I prepared myself for battle.

First I carefully removed the stile with a jig saw.

 How to Improve Access to Dead Kitchen Cabinet Space/HomeStagingBloomingtonIL

Next I took a 2 x 4, put it against the cabinet and took a mighty swing. The hammer bounced off that board like a soccer ball, and I laughed so hard I nearly passed out. I tried again and again…and again. Honestly, my brother had way too much faith in me on this one.

So I carefully took my jig saw, and cut as far as I could along the top and bottom of the board. I couldn’t cut through the entire length of the board because my stove was in the way of the saw. After cutting as far as I could, I decided enough was enough, and gave that board a Ninja kick that I’m confident would have impressed Jackie Chan.

 How to Improve Access to Dead Kitchen Cabinet Space/HomeStagingBloomingtonIL

Finally!

 How to Improve Access to Dead Kitchen Cabinet Space/HomeStagingBloomingtonIL

I cut out the remaining dowel rods that held the piece in place, and sanded them smooth.

How to Improve Access to Dead Kitchen Cabinet Space/HomeStagingBloomingtonIL

I decided to replace the board from hell with the smallest board that I could, but being sure to leave enough clearance around the oven door for pull-out shelves. I changed my mind about the stationary shelf. A woman’s prerogative.

So I used a 1 x 3 in the space.

 How to Improve Access to Dead Kitchen Cabinet Space/HomeStagingBloomingtonIL

 How to Improve Access to Dead Kitchen Cabinet Space/HomeStagingBloomingtonIL

This was my first opportunity to use my new Kregg Jig K5 for drilling the pocket holes in the 1 x 3. Now if I decide to change the cabinet again someday, all I have to do is unscrew the piece instead of risking a fractured foot.

 How to Improve Access to Dead Kitchen Cabinet Space/HomeStagingBloomingtonIL

Here’s the piece installed. I planned to paint my cabinets white, so I didn’t have to worry about wood types matching. I’ll be filling the grain on the oak before I paint so they’ll look the same after painting.

 How to Improve Access to Dead Kitchen Cabinet Space/HomeStagingBloomingtonIL

Here’s a side view looking through the stove handle showing proper clearance for the pull outs.

 How to Improve Access to Dead Kitchen Cabinet Space/HomeStagingBloomingtonIL

I whipped up this simple shelf for the inside of the cabinet. It’ll be tucked in to the left of the opening, and will sit beside the pull-out shelves.

 How to Improve Access to Dead Kitchen Cabinet Space/HomeStagingBloomingtonIL

 How to Improve Access to Dead Kitchen Cabinet Space/HomeStagingBloomingtonIL

Fast forwarding here, I built a simple box for the first pull out drawer. I used the hardware from the original drawer and scrap wood I had on hand.

How to Improve Access to Dead Kitchen Cabinet Space/HomeStagingBloomingtonIL

I tried the first one out before making the second one. It was a good thing, as the first one didn’t fit the opening and I had to disassemble it and make it smaller. Ugh. Here’s drawer number two. There was a pull out drawer in this cabinet originally, so I was also able to use the hardware from that one too. I just had to build a new  drawer the right size for the opening.

 How to Improve Access to Dead Kitchen Cabinet Space/HomeStagingBloomingtonIL

Since the hardware for the pullouts wasn’t white, I had to spray paint it so it would blend in better. The photo is of the drawer upside down.

 How to Improve Access to Dead Kitchen Cabinet Space/HomeStagingBloomingtonIL

How to Improve Access to Dead Kitchen Cabinet Space/HomeStagingBloomingtonIL

 How to Improve Access to Dead Kitchen Cabinet Space/HomeStagingBloomingtonIL

I had this dentil molding leftover from an old project, and had just enough to use as decorative face plates for the pull outs.

 How to Improve Access to Dead Kitchen Cabinet Space/HomeStagingBloomingtonIL

 How to Improve Access to Dead Kitchen Cabinet Space/HomeStagingBloomingtonIL

For your amusement, here’s an ugly picture of the cabinets after I filled the grain prior to painting.

 How to Improve Access to Dead Kitchen Cabinet Space/HomeStagingBloomingtonIL

Now it’s starting to look like something!

Here’s the much more functional cabinet. It’s not any bigger than it was before, but with the added shelf unit inside, the larger opening and the pull out drawers, it just makes life easier.

How to Improve Access to Dead Kitchen Cabinet Space/HomeStagingBloomingtonIL

 How to Improve Access to Dead Kitchen Cabinet Space/HomeStagingBloomingtonIL

Here are some before and after photos.

How to Improve Access to Dead Kitchen Cabinet Space/HomeStagingBloomingtonIL

How to Improve Access to Dead Kitchen Cabinet Space/HomeStagingBloomingtonIL

In case you missed the original peninsula re-do which was the start of this makeover, here are before and afters of that too. (See peninsula tutorial here.)

 photo IMG_6775.jpg How to Improve Access to Dead Kitchen Cabinet Space/HomeStagingBloomingtonIL

I’ve got many steps left on this makeover—making a wooden counter top and cutting down another one until I can afford new ones, building open shelving, replacing the current 30″upper cabinets with taller 42″ ones, adding trim and hardware, having a few doors drilled for hidden hinges and more. Baby steps.

This post was written by Tracy Evans who is a Journeyman Painter and Certified Home Stager /Redesigner. Feel free to visit her website at www.HelpAtHomeStaging.com to view more before and after pictures of her projects. And if you enjoy gardening, you may want to visit her gardening blog at MyUrbanGardenOasis.

Add Character to a Kitchen Island/Peninsula-DIY

DIY Kitchen Peninsula Upgrade

Want to get rid of that builder grade faux wood paneling on your kitchen island or peninsula? You know the stuff. It resembles those wood panels that used to be on the sides of station wagons. I’ve had it in every kitchen I’ve owned. But I’ve learned that I don’t have to live with it. And neither do you.

This peninsula update is the first step of many to come in a mini DIY remodel that I’m about to undertake in my small, non-functional kitchen. I’ve had smaller kitchens, but my current kitchen, hands down, wins the award for the least functional. It also ranks right up there with the least aesthetically pleasing.

So here are my before pictures. Pretty standard as far as peninsulas go. This kitchen is one big ball of patterned brown. I love brown, but there are brown patterns that fight each other in the oak grain, the flooring and the countertops. Makes me dizzy. This kitchen is not a safe place for anyone who is prone to seizures—that’s for sure.

 Add Character to a Kitchen Island/Peninsula-HomeStagingBloomingtonIL

 Add Character to a Kitchen Island/Peninsula-HomeStagingBloomingtonIL

I’ve been collecting posts on Pinterest for kitchen ideas, and to give credit where credit is due, I copied this design from “Remodelaholic”. And I combined her project with a photo I saw on “DIY Network”. This transformation can be done with basic carpentry skills, and isn’t all that expensive.

Step one was to remove the corner trim piece so I could pry back the existing paneling and locate the studs, water lines and electrical wires. My dishwasher is in my peninsula, so I was aware that the potential existed for an electrical shock or a flash flood if my nail hit just the right spot.

 Add Character to a Kitchen Island/Peninsula-HomeStagingBloomingtonIL

Unfortunately the installer for my new dishwasher had to remove some studs in order to get it to fit into the space where the old one was. That leaves me with only a few studs to attach my boards to. I knew that was going to be my biggest challenge. However, I was relieved to find no water lines running through the studs like I had in my last house, and there were only two electrical wires that were going to be relatively easy to avoid. Here’s one of them.

 Add Character to a Kitchen Island/Peninsula-HomeStagingBloomingtonIL

So I marked my stud locations on my counter top with some tape, and I taped another area to mark a board from the back of a cabinet that I could use to nail into. And of course, there will always be a 2 x 4 on the floor, on the outside corners and against the wall that were used in framing.

 Add Character to a Kitchen Island/Peninsula-HomeStagingBloomingtonIL

I had to remove a piece of baseboard on the wall adjacent to the peninsula since it was going to have to be trimmed down afterwards.

 Add Character to a Kitchen Island/Peninsula-HomeStagingBloomingtonIL

The only other out-of-the-ordinary item I had to deal with, was an electrical outlet that I had to move up about 1/2″.

 Add Character to a Kitchen Island/Peninsula-HomeStagingBloomingtonIL

I decided to use bead board paneling for this project, and Lowe’s had a new kind that looked like traditional bead board on steroids. The routed groves were much larger and farther apart. A  4′ x 8′ sheet of traditional bead board paneling ran around $20. The more unique version that I decided to use was $30 a sheet. The extra $10 was worth it to me.

Lowe’s will cut plywood for their customers, and so will Home Depot. Not only does it save me the hassle of cutting it, but a 4′ x 8′ sheet won’t fit in my tin can of a car. I had them make me four panels which required four cuts. The first two cuts were free, and the second two cost me 25 cents. Again, worth it. I also had a large scrap piece leftover to use on another project.

I had the panels cut to a size that was 1/4″ shorter than the actual height of my counter tops so that I could mount them off the floor a bit. Dishwasher + leak = potential water on the floor at some point. Cutting it short also allowed for any wonkiness as far as the possibility of the sheets not being cut perfectly square (sorry Lowe’s) or my floors/counters etc…not being square (sorry house).

So I attached the bead board to the peninsula, setting it on a ruler to raise it while I hammered. I’m happy to report I only hit my thumb once, but I’ll admit I did bend a handful of nails that had to go in the garbage. I also broke two drill bits while pre-drilling. Like I said, I’m not a carpenter. I also used a level to make sure each sheet was plumb.

Add Character to a Kitchen Island/Peninsula-HomeStagingBloomingtonIL

Here’s a photo after the bead board was attached. Since I didn’t have much of a selection of studs to hammer into, some of the pieces only had one nail on top and one on the bottom, but I knew when I added the trim, some of those nails would also be penetrating the bead board to hold it on too. The trim itself would also help secure it.

 Add Character to a Kitchen Island/Peninsula-HomeStagingBloomingtonIL

I had to trim around the outlet, and I also had to shave down part of the toe kick that extended past the end of the cabinet in order for the bead board to lay flat against the cabinet.

 Add Character to a Kitchen Island/Peninsula-HomeStagingBloomingtonIL

 Add Character to a Kitchen Island/Peninsula-HomeStagingBloomingtonIL

Next, I added 1 x 4 pieces of MDF that I cut down from a leftover sheet I already had, and attached those. I also kept those up off the floor. MDF and water do not mix.When MDF gets wet, it puffs up like a toasted marshmallow.

Add Character to a Kitchen Island/Peninsula-HomeStagingBloomingtonIL

Next came the horizontal pieces. I had to cut a hole in the trim piece that went around the outlet.

 Add Character to a Kitchen Island/Peninsula-HomeStagingBloomingtonIL

Add Character to a Kitchen Island/Peninsula-HomeStagingBloomingtonIL

Here’s how it looked with the horizontal pieces added.

Add Character to a Kitchen Island/Peninsula-HomeStagingBloomingtonIL

The bottom board is a 1 x 8, so that once I put the baseboard on, there will be a reveal equal to the rest of the 1 x 4 trim.

The next step was to install the remaining vertical boards. These will cover the areas where the sections of bead board paneling meet.

Add Character to a Kitchen Island/Peninsula-HomeStagingBloomingtonIL

The previous photo shows that my vertical board placement didn’t line up with any studs (marked by the blue tape on the counter top). In order to attach these two pieces, I just pre-drilled at an angle so my nails would go into the horizontal pieces that were nailed into studs. This is where I managed to snap my last 1/16 bit. Sigh.

Add Character to a Kitchen Island/Peninsula-HomeStagingBloomingtonIL

A suggestion from the “Remodeloholic” post, was to round over the edges of the trim boards, so that once installed, there is an intentional space where the trim boards meet. That way, there’s no need to caulk or putty those areas.

 Add Character to a Kitchen Island/Peninsula-HomeStagingBloomingtonIL

 Add Character to a Kitchen Island/Peninsula-HomeStagingBloomingtonIL

Here all of the trim pieces were installed.

 Add Character to a Kitchen Island/Peninsula-HomeStagingBloomingtonIL

Next came the baseboard. The baseboard is the only piece placed directly on the floor to cover the gaps from the bead board, the corner trim and the 1 x 8’s. It would be simple enough to replace if it were to get wet.

Add Character to a Kitchen Island/Peninsula-HomeStagingBloomingtonIL

 Add Character to a Kitchen Island/Peninsula-HomeStagingBloomingtonIL

In order to keep costs down on my projects, I usually buy “lesser” quality pine boards and then spackle over any knots or dings at the same time I putty all my nail holes. I sand and paint, and the imperfections are impossible to find afterwards.

 Add Character to a Kitchen Island/Peninsula-HomeStagingBloomingtonIL

 Add Character to a Kitchen Island/Peninsula-HomeStagingBloomingtonIL

Next a coat of primer.

 Add Character to a Kitchen Island/Peninsula-HomeStagingBloomingtonIL

After the primer dried, I caulked every place that the trim met the bead board, and along the top of the baseboard. This is an important step, and makes everything professional looking.

 Add Character to a Kitchen Island/Peninsula-HomeStagingBloomingtonIL

 Add Character to a Kitchen Island/Peninsula-HomeStagingBloomingtonIL

Then I painted everything with two coats of paint, sanding in between coats. Finished!

Add Character to a Kitchen Island/Peninsula-HomeStagingBloomingtonIL

Add Character to a Kitchen Island/Peninsula-HomeStagingBloomingtonIL

Now the traditional before and afters.
 Add Character to a Kitchen Island/Peninsula-HomeStagingBloomingtonIL

Add Character to a Kitchen Island/Peninsula-HomeStagingBloomingtonIL

 Add Character to a Kitchen Island/Peninsula-HomeStagingBloomingtonIL

Add Character to a Kitchen Island/Peninsula-HomeStagingBloomingtonIL

Since I had some of the pine boards and MDF already, I don’t know exactly what this project cost, but I would approximate not more than $50, with $30 of that being for the bead board.

A cheaper version would be to leave out the bead board and mount the trim directly onto the existing faux wood paneling. Give the paneling a light sand, a good primer and a good quality paint and you’re on your way. I’ve done that too!

Honestly, the worst part of this project was the major splinter I got in my hand when picking out the wood. It was all smooth sailing after that.

Author’s edit: And here she is after surviving nearly two weeks in the palm of my hand. My daughter, Sophie, was my splinter remover, but she moved to Los Angels. Now I’m on my own in the foreign object removal department. (Thus the two week hibernation period.)

 photo IMG_68361.jpg

Now on to another cabinet…

This post was written by Tracy Evans who is a Journeyman Painter and Certified Home Stager /Redesigner. Feel free to visit her website at www.HelpAtHomeStaging.com to view more before and after pictures of her projects. And if you enjoy gardening, you may want to visit her gardening blog at MyUrbanGardenOasis.

DIY Pantry Spice Rack

DIY pantry door spice rack

I would like to dedicate this post to my mother, who passed away April 17th, 2016. This one’s for you, Mom. ♥

Once upon a time, I created a super-organized pantry. Then I moved. (Sigh.) But new beginnings bring new opportunities, so here’s my new and improved pantry. After much searching for different ways to organize spices and such,  I tweaked some Pinterest ideas, and here’s what I ended up with.

 DIY Pantry Spice Rack/HomeStagingBloomingtonIL.wordpress.com

Let me first say that I had some reservations about this project, not because of the building of the racks, but because of the uncertainty of mounting them on a hollow-core door. If you have the same hesitation, don’t sweat it because mounting the units was easy, and they feel very safe and secure.

This project requires only basic carpentry skills. And if you’re reading this tutorial, you will also benefit from my mistakes, as I’ll also be sharing with you what not to do. You’re welcome.

My projects are usually pretty inexpensive because I use leftovers from previous projects, treasures from garage sales, and special finds from curb shopping. (I pull a ridiculous amount of wood off of curbs.) That being said, this project is no exception and cost me less than $25. A wire-coated rack would cost two to three times that much, and wouldn’t be specific to your needs like one you can make yourself.

First, I gathered up all of my spices and other items that I wanted to store in the racks, so I would know how to space the shelves and how much wood I was going to need.

 DIY Pantry Spice Rack/HomeStagingBloomingtonIL.wordpress.com

I found it helpful to draw a simple sketch, although I did change some of the shelf spacing as I got further into this project. (Incidentally, the second set of numbers on my rough sketch don’t add up to the total shelf dimensions, as they were measurements of the spaces not including the wood. My math isn’t that bad.)

 DIY Pantry Spice Rack/HomeStagingBloomingtonIL.wordpress.com

Since I was doing this project without help, and because of my irrational fear of mounting something on a hollow core door, I decided to break this down into two more manageable units rather than one big one. That turned out to be a very good thing.

Since spices are small and lightweight, I used thin pieces of wood to build the top section. I used Pine Mull Casing scraps that I had leftover from another project.

 DIY Pantry Spice Rack/HomeStagingBloomingtonIL.wordpress.com

I have no clue what mull casing’s intended purpose is, but I’m pretty sure it wasn’t created for DIY spice racks. It resembles lattice, but is thicker. I strongly suggest not attempting to use lattice for this project because nails need to be driven into the skinny side of the wood, and lattice is too thin.  The mull casing measured 3/8″ thick, and just shy of 2″ wide—just like it said on the sticker in the last photo. Imagine that.

 DIY Pantry Spice Rack/HomeStagingBloomingtonIL.wordpress.com
  DIY Pantry Spice Rack/HomeStagingBloomingtonIL.wordpress.com

Most of the spice racks I saw on Pinterest used wooden dowels to hold the spices in place, which is nice because a small dowel won’t cover up too much of a spice container’s label. However, I chose not to use dowels for four reasons. I would have had to use a wider, bulkier piece of wood to construct the frame if I went with dowels, since a dowel eats up shelf depth; because they are a son-of-a-gun to paint; because I didn’t want the stress of trying to drill the mounting holes perfectly even on the side boards and because I had something else on hand that I could use for free.

And my free dowel substitute was…(da, da-da, daaaaa), wood from a clothes-drying rack. Yes siree, ladies and gentlemen. Recycling at its finest. I disassembled the pieces, and spackled over the center holes to make them disappear. The end holes were cut off when I cut the pieces down to fit the units. I know what you’re thinking. But for the record, I’ve used these before on a similar project, and once they’re painted up, they look great. I also liked these because the edges were routed. If you don’t happen to have a broken clothes drying rack lying around, screen molding or another small piece of trim would be another option.

 DIY Pantry Spice Rack/HomeStagingBloomingtonIL.wordpress.com 
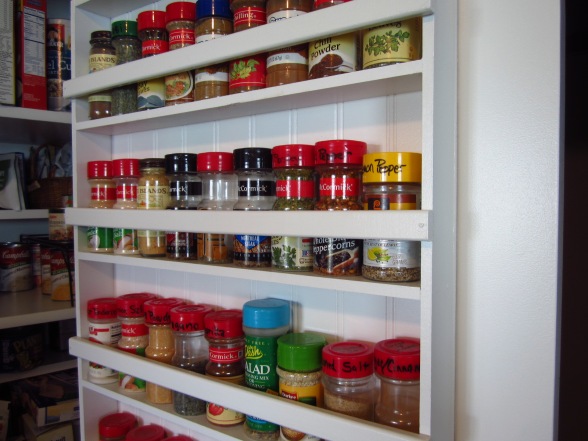
I used the recycled wood pieces for the bars that hold in the taller spices, and to make a ledge to hold my smaller spices on the shelves without covering their labels.

 DIY Pantry Spice Rack/HomeStagingBloomingtonIL.wordpress.com

I bought bead board paneling for the back of the shelves. Not only did it keep the shelving unit square and more secure, but it was what I screwed into to attach it to the door. Plus it looks sweet! Home Depot sells 32″ x 48″ sheets of bead board for $10, and they cut it to size for me. I laid everything out to get an idea of spacing.

 DIY Pantry Spice Rack/HomeStagingBloomingtonIL.wordpress.com

The bead board on my top unit was 18″ wide x 32″ tall, and the bead board for the bottom unit was 18″ wide by 30″ tall. My pantry door measured about 24″ x 7′, which left roughly three inches of space on each side to allow the door to open and shut freely. Very important.

I suggest priming and painting the wood pieces before you cut them. You can paint it in half the time with a lot less mess. I didn’t paint first because I was on a roll and didn’t want to stop, but this is one of those important do-as-I-say-not-as-I-do suggestions.

I cut all my pieces making sure that all of the shelves were exactly the same length, and making sure that the two side pieces were exactly the same length. If the boards are not of equal length, you will not be a happy camper when you assemble them.

For the small spice containers, the space between shelves (not including the shelf itself–air space only) was about 3 3/4″, and for the taller spice containers, the space was 6″. That spacing allowed just enough “headroom” to be able to lift the taller containers up and over the bar that kept them from falling out.

Next I pre-drilled all my nail holes. Simply put, I stink with a hammer. And since there wasn’t much room for error on this thin wood, I needed the nails to go in very straight. Also, the nails were tiny and would bend easily if I didn’t have pre-drilled holes. Bending nails while hammering them is my specialty.

  DIY Pantry Spice Rack/HomeStagingBloomingtonIL.wordpress.com

I pre-drilled two holes per shelf on the pieces of wood that formed the sides of the unit, and partially inserted my nails. I knew that assembling this was going to be a balancing act, and I didn’t want to be scrounging for nails while trying to hold the boards, with a hammer clenched between my teeth.

 DIY Pantry Spice Rack/HomeStagingBloomingtonIL.wordpress.com

  DIY Pantry Spice Rack/HomeStagingBloomingtonIL.wordpress.com

 DIY Pantry Spice Rack/HomeStagingBloomingtonIL

I glued the end of every board I nailed. And yes, I did get this unopened glue for $1 at a garage sale (note sticker). If you are buying wood glue for this project, make sure to get paintable glue.

  DIY Pantry Spice Rack/HomeStagingBloomingtonIL.wordpress.com

Then I nailed and nailed…

A smaller upholstery hammer worked best for the small nails.

 DIY Pantry Spice Rack/HomeStagingBloomingtonIL.wordpress.com

 DIY Pantry Spice Rack/HomeStagingBloomingtonIL.wordpress.com

  DIY Pantry Spice Rack/HomeStagingBloomingtonIL.wordpress.com

  DIY Pantry Spice Rack/HomeStagingBloomingtonIL.wordpress.com

Then I laid my rack on the bead board to make sure it was square.

 DIY Pantry Spice Rack/HomeStagingBloomingtonIL.wordpress.com

I loosely tacked the bead board to the shelf to keep it square while the glue dried, although that probably wasn’t necessary since it was pretty square on its own. ( Can you say OCD?) I tacked it loosely so that after the glue set up, I could remove the bead board, and paint it more easily.

  DIY Pantry Spice Rack/HomeStagingBloomingtonIL.wordpress.com

 DIY Pantry Spice Rack/HomeStagingBloomingtonIL.wordpress.com

Next, I repeated the same process for the bottom unit, only I used 1 x 4 pine instead of mull casing in order to accommodate larger items.

  DIY Pantry Spice Rack/HomeStagingBloomingtonIL.wordpress.com

Next I primed, and then painted using a latex semi-gloss paint from Sherwin Williams in the color “Pure White”. You must prime raw wood before painting it if you want your paint to adhere.

The bead board was already white when I bought it, but I painted it so that when I had paint touch-ups after I mounted it (fingerprints, glue, hammer marks), the whites all matched. And you will have paint touch ups, trust me. I made sure I painted the edges of my bead board since they’ll be visible.

  DIY Pantry Spice Rack/HomeStagingBloomingtonIL.wordpress.com

  DIY Pantry Spice Rack/HomeStagingBloomingtonIL.wordpress.com

After the paint dried, I assembled all the wood pieces. I used nails and glue to attach the bead board backing. I also drove a nail through the back of the bead board and into the center of each shelf to prevent the shelves from sagging or warping over time.

 DIY Pantry Spice Rack/HomeStagingBloomingtonIL.wordpress.com

Then came the scary installation part. This was especially nerve-racking for me because I had just installed new interior doors. And if that weren’t enough, they were special ordered from Lowe’s, so if I messed up the door, it was going to be awhile before I could get a new door to try again. Pressure. Here are the hollow-door anchors I used. A package of four was under $2 at Home Depot.

 DIY Pantry Spice Rack/HomeStagingBloomingtonIL.wordpress.com

Basically, how these work is you hold your item to be hung, up on the door. You drill through your item and into the door where you want your screws to be. Remove the item, install the anchor into the hole you drilled in the door and then put the item back up and screw it on. Boom. Done. But not so fast.

I drilled holes for the mounting screws through the bead board backing where I felt the screws would be hidden behind the spices. I did this without holding the shelf up to the door since I knew it would be difficult for me to hold up the shelf and drill at the same time. Not a great idea.

  DIY Pantry Spice Rack/HomeStagingBloomingtonIL.wordpress.com

Unfortunately, I didn’t take into account where the recessed panels on the door were. So when I held the drilled shelf up to the door, re-drilled through the existing holes in the bead board and into the door, the holes ended up in a recessed panel. I will admit a swear word left my lips on that one. So I ended up drilling two more holes in my bead board and my brand new door. (Personal thank you to whoever invented spackle.) Here’s a picture of where you don’t want your holes to end up.

 DIY Pantry Spice Rack/HomeStagingBloomingtonIL.wordpress.com

I decided to use three anchors for each shelf unit, but four–one in each corner–would have been better.

Since my door had a handle rather than a knob, I had to be sure to place the bottom unit low enough so that it didn’t interfere with the handle’s operation.

 DIY Pantry Spice Rack/HomeStagingBloomingtonIL.wordpress.com

I was still leery of this whole hollow door issue, so I decided it best to install the lower shelf first. A screw-up down low wouldn’t be as noticeable.

I stacked pieces of wood on the floor under the shelf, so I wouldn’t have to try to hold it while I was drilling. I made sure it was at the desired height, centered and level on the door. Next I drilled through my existing holes in my bead board (the second set–ugh) and into the door.

 DIY Pantry Spice Rack/HomeStagingBloomingtonIL.wordpress.com

I removed the shelf from the wood stack, and screwed the wall anchors into the holes I had drilled in the door. The creaking noises during the screw turning made me cringe a bit, but I kept plugging away—ever so gently.

 DIY Pantry Spice Rack/HomeStagingBloomingtonIL.wordpress.com

 DIY Pantry Spice Rack/HomeStagingBloomingtonIL.wordpress.com

Since hollow core doors these days are sort of cardboardish, I was left with fuzzies around the anchors. My OCD was wanting to give that thing a hair cut, and I openly admit I started to remove it with a utility knife. But I got a grip and quit because that tiny bit of “squish-out” is never going to be seen—ever.

I propped the shelf back up on the piece of wood, lined up the holes in the bead board with the wall anchors (I could actually see the anchors through my drilled holes if I looked closely) and installed the screws.

I repeated the process with the top shelf. Installing the bottom unit first, turned out to be a good idea because I could balance the top unit on it while I leveled and drilled.

  DIY Pantry Spice Rack/HomeStagingBloomingtonIL.wordpress.com

Lastly, I painted the screws and touched up the paint as needed.

I had actually stopped using most of my spices after I’d moved because it was such a hassle to find what I needed. You can see why from this “before” photo.

  DIY Pantry Spice Rack/HomeStagingBloomingtonIL.wordpress.com

And here are my after photos.

  DIY Pantry Spice Rack/HomeStagingBloomingtonIL.wordpress.com

  DIY Pantry Spice Rack/HomeStagingBloomingtonIL.wordpress.com

  DIY Pantry Spice Rack/HomeStagingBloomingtonIL.wordpress.com

 DIY Pantry Spice Rack/HomeStagingBloomingtonIL.wordpress.com

It took me about a day and a half from start to finish for this project. That included figuring out how to space everything, a trip to Home Depot for supplies, painting, assembling and hanging. It was well worth the time, as these storage units have made my life so much easier, and now I have two empty cupboards in my kitchen!

 DIY Pantry Spice Rack/HomeStagingBloomingtonIL.wordpress.com

If this project seems too complicated for you, and your spice cupboard is a wreck, you may want to check out my simpler “no construction” Dollar Store idea for storing spices by “Clicking Here“.

This post was written by Tracy Evans who is a Certified Home Stager, Certified Redesigner and Journeyman Painter. Feel free to visit her website at www.HelpAtHomeStaging.com to view more before and after pictures of her projects. And if you enjoy gardening, you may want to visit her gardening blog at MyUrbanGardenOasis.

How to Fix a Warped Cabinet Floor

How to Fix a Warped Cabinet Floor

I’m guessing most of you DIYers out there are familiar with the idea of installing self-stick floor tiles on the floors of kitchen cabinets—usually inside the cabinet under the kitchen sink. That’s a space that can get pretty gruesome over time.

I had been wanting to tackle this in my current home, but my cabinet floor was warped. I’m guessing the kitchen sink had a leak when the previous owners lived here. When I laid a level across it, I could see a dip of almost a full inch at its lowest point, and I knew the tiles wouldn’t adhere to a surface that dipped like a cereal bowl.

I decided since I couldn’t install the tiles, I would cover the cabinet floor with non-stick shelf paper. Not one of my better ideas. It quickly became just as ugly as it was before I tried to spruce it up. Plus the shelf paper wasn’t a solution for the warped floor. You can’t really see the dip in this picture, but here’s a before picture anyway just for kicks. You’ll just have to trust me that it was nasty under there.

How to Fix a Warped Cabinet Floor/HomeStagingBloomingtonIL

So one day, a light bulb actually appeared over my head in one of those little white clouds. (Not kidding.) I had an idea. I decided to search through my stash of scrap wood for some skinny pieces to fill in the divot. Then I could cover the scraps with a thin sheet of plywood, and then I could cover the plywood with those fabulous self-stick linoleum tiles.

Since there was a divider in the center of the front of the cabinet where the doors close (you can see this in the above photo), there was no way to install a single sheet of plywood big enough to cover the whole floor. But I just happened to have two pieces of plywood that I could cut down to fit through the two cabinet door openings, and could piece them together to cover the cabinet floor.

Here’s a picture of the darker small scraps on the floor of the cabinet that are placed in the dip. I just kept layering pieces in the low part until it was level with the rest of the floor. Then I laid a piece of plywood that I cut to fit, over the top of the scraps (on the left side in the photo). The other piece I used to finish the floor is the darker piece that is leaned up against the side of the cabinet on the right in the photo. I used 3/8″ plywood that I had leftover from another project for both the scraps that are filling the dip, and for the actual “sub-floor” placed on top of the scraps.

How to Fix a Warped Cabinet Floor/HomeStagingBloomingtonIL

Next I laid down the second piece of plywood to complete the cabinet floor. The colors of the two pieces didn’t match because one of them was stained and one of them wasn’t, but they were going to be covered with tiles, so no biggie.

How to Fix a Warped Cabinet Floor/HomeStagingBloomingtonIL

I had to tack down the plywood in a few places since the pieces were a little wonky from being stored in my garage.

 How to Fix a Warped Cabinet Floor/HomeStagingBloomingtonIL

How to Fix a Warped Cabinet Floor/HomeStagingBloomingtonIL

Here’s my new mini “sub-floor”, so nice and flat now! I was pretty happy at this point because I could see this was actually going to work.

 How to Fix a Warped Cabinet Floor/HomeStagingBloomingtonIL

Here are the amazing, kick-butt self-stick linoleum tiles that I bought for $2.00 at a garage sale this past summer. In case you’re not familiar with this type of flooring, think of each square as a sticker on steroids. You just peel a sheet off the back to reveal the sticky back side of the tile, and simply press it into place.

How to Fix a Warped Cabinet Floor/HomeStagingBloomingtonIL

I had no prior experience with these tiles, and was pleasantly surprised at how easy they were to cut using a utility knife against a straight edge. I laid the tiles on a scrap piece of wood while cutting so as not to cut directly against my floor. I started in the front/center of the “floor” and worked my way back.

How to Fix a Warped Cabinet Floor/HomeStagingBloomingtonIL

Here’s my finished project. My hope is that if there’s ever a leak in the sink again, that these tiles will protect the floor somewhat. The tiles, with their slick finish will also be easy to clean.

How to Fix a Warped Cabinet Floor/HomeStagingBloomingtonIL

How to Fix a Warped Cabinet Floor/HomeStagingBloomingtonIL

It’s so nice to have a clean area under the kitchen sink. The bathroom vanities are next on the list!

This post was written by Tracy Evans who is a Certified Home Stager, Certified Redesigner and Journeyman Painter servicing the Central Illinois area. Feel free to visit her website at www.HelpAtHomeStaging.com to view her portfolio for more before and after pictures of her projects. And if you enjoy gardening, you may want to visit her gardening blog at MyUrbanGardenOasis.

Add Trim to Builder-Grade 42″ Kitchen Cabinets–Crown Substitute

Crown molding substitute

If you’re looking for a way to add interest to builder-grade cabinets, here’s an easy and inexpensive upgrade.

I happen to have those run-of-the-mill, builder-grade, ho-hum oak kitchen cabinets that everyone on the planet seems to have. I painted them white and added bead board wallpaper to the insets a few years ago (See previous post “Yes You Can Paint Your Oak Kitchen Cabinets“). I loved the transformation, but always wished I had crown molding on my upper cabinets.

The problem was, my 42” cabinets butted up against the ceiling so there was no room for crown. However, my combination OCD, tunnel vision and I-will-have-crown-if-it-kills-me attitude were not to be defeated. I made the decision that I was going to add some type of trim somewhere to catapult my cabinets out of Dullsville. I went on a search for trim, knowing I didn’t want to use the standard quarter round. Here’s the winning trim from Home Depot.

 Add Trim to Builder-Grade Kitchen Cabinets / HomeStagingBloomingtonIL

Here are before and after pictures of the bottom of one of the cabinets without trim, and after trim was added. I didn’t think I’d be able to find trim small enough to fit in the area below the cabinet doors without it looking too small and chintzy, but this was perfect.

 Add Trim to Builder-Grade Kitchen Cabinets / HomeStagingBloomingtonIL

 Add Trim to Builder-Grade Kitchen Cabinets / HomeStagingBloomingtonIL

I sandwiched a piece of screen molding as a spacer, in between the new trim piece and the side of the cabinet. Otherwise there would have been a gap because the cabinet corners protrude past the flat side of the cabinet. You can see it in this photo.

Add Trim to Builder-Grade Kitchen Cabinets / HomeStagingBloomingtonIL

 Add Trim to Builder-Grade Kitchen Cabinets / HomeStagingBloomingtonIL

I then flipped the trim upside down, and installed it at the top of the upper cabinets against the ceiling. Again, the space for decorative trim was pretty small, but it fit nicely. It’s not crown molding, but it added a decorative touch, and covered the ugly crack where the cabinet met the ceiling. I caulked around all the trim and painted…again.

 Add Trim to Builder-Grade Kitchen Cabinets / HomeStagingBloomingtonIL

To make the project easier, I primed the trim and put one coat of paint on it prior to installation. After I installed the trim, I puttied my nail holes, caulked and put a final coat on the trim.

The trim for this project was only $15. I needed basic tools, including an inexpensive miter box, hammer, trim nails and a caulk gun. This project shows that a tiny piece of decorative trim can go a long way to adding some much-needed charm to boring cabinets. Your turn!

This post was written by Tracy Evans who is a Certified Home Stager, Certified Redesigner and Journeyman Painter servicing the Central Illinois area. Feel free to visit her website at www.HelpAtHomeStaging.com to view her portfolio for more before and after pictures of her projects. And if you enjoy gardening, you may want to visit her gardening blog at MyUrbanGardenOasis.

DIY Rolling Pantry Tucks Into Space by Fridge

Rolling Pantry for kitchen

Do you have an empty space in your kitchen next to your refrigerator? If you do, and want to make good use of that space, you might want to add this rolling pantry to your honey-do list.

DIY Rolling Pantry / HomeStagingBloomingtonIL

I wish I could take credit for this idea, but I can’t. I saw it on a Facebook post, and decided to construct one, only with a couple of tweaks to make it work better for my situation. Here’s the original post—http://www.instructables.com/id/Hidden-Fridge-Gap-Slide-Out-Pantry/.

I agonized over measurements for about half a day before deciding to build the pantry one inch smaller than the width of the space. This allowed for a decent amount of wiggle room when wheeling it in and out.

I purchased MDF (medium density fiberboard) from Home Depot, which is my all-time favorite construction material. It’s amazingly smooth, doesn’t splinter or have distracting knots, and it paints beautifully. The only con I’m aware of is that it can’t be exposed to water, so it can only be used on interior projects.

I bought a 3/4″ thick, 4′ x 8′ sheet of MDF, and Home Depot cut it down into seven boards, all at a length of 5’4″ by 6 3/4″. I originally wanted the pieces cut at seven inches, but I went with 6 3/4″ instead so I could get an extra board out of the sheet. I allowed 1/8 inch loss of material for each cut made, as that is the saw blade thickness.

I used two of the 5’4″ pieces for the sides of my unit, and cut the rest of the boards at home for the individual shelves, and the top and bottom pieces. I had a nice sized piece left over for another project too. Hernia alert!! MDF is very heavy. If you plan to purchase a sheet of it to cut at home, be sure to have help carrying it! Here are my cut pieces.

DIY Rolling Pantry / HomeStagingBloomingtonIL

I constructed the rolling pantry as you would construct any bookcase, and used a bead board plywood scrap that I had on hand for the back to keep it square.

DIY Rolling Pantry / HomeStagingBloomingtonIL

I used several garage sale purchases that I had on hand to keep the cost down, including finish nails, the handle, the wheels and some upholstery tacks.

DIY Rolling Pantry / HomeStagingBloomingtonIL

First I cut my bead board to the size I wanted my unit to be. I then constructed a box with simple butt joints to fit the size of the bead board, being sure to glue all four corner butt joints. The top and bottom pieces should be placed in between the two side pieces, rather than on top and on bottom of the two side pieces. It makes for a more sturdy piece, since gravity would be working with your nails if they’re perpendicular to the floor instead of parallel to the floor. You want your nails working against gravity whenever possible.

DIY Rolling Pantry / HomeStagingBloomingtonIL

I like using upholstery tacks for attaching backing to a shelving unit because the big heads don’t allow the bead board to pull off. If finishing nails are used, the bead board can be pushed off right over the top of them. I used wood glue here too.

DIY Rolling Pantry / HomeStagingBloomingtonIL

Then I decided where I wanted my shelves to be, based on what I anticipated storing on them.

DIY Rolling Pantry / HomeStagingBloomingtonIL

It’s much easier to paint shelves before installation, so I put a coat of primer and a coat of finish on the shelves, and all the semi-assembled pieces.

DIY Rolling Pantry / HomeStagingBloomingtonIL

After I installed the shelves, I caulked, spackled and applied the final coat of paint. Caulking the cracks makes for a much more professional-looking job as you can see here.

DIY Rolling Pantry / HomeStagingBloomingtonIL

DIY Rolling Pantry / HomeStagingBloomingtonIL

Here’s when I realized the importance of using the right kind of wheels. I have a bucket of miscellaneous hardware that I pulled this first set of garage sale wheels out of.

DIY Rolling Pantry / HomeStagingBloomingtonIL

I tried wheeling the pantry on these wheels, and as luck (or lack thereof) would have it, they weren’t a good choice. They were made of glass or porcelain, and I’m guessing they used to be on an antique piece of furniture. They would probably have been just fine on linoleum, but they weren’t well-suited for ceramic tile since they wouldn’t grip the tile. And since they were small, they were catching in my grout lines. So back out to my junk bucket I went. I found these larger, rubber wheels, and they worked much better.

DIY Rolling Pantry / HomeStagingBloomingtonIL

DIY Rolling Pantry / HomeStagingBloomingtonIL

Since my garage sale wheels didn’t come with screws, I searched my garage sale screw stash and found the perfect size.

DIY Rolling Pantry / HomeStagingBloomingtonIL

Here’s the finished rolling pantry. Ta-da!!

DIY Rolling Pantry / HomeStagingBloomingtonIL

Going…

DIY Rolling Pantry / HomeStagingBloomingtonIL

Going…

DIY Rolling Pantry / HomeStagingBloomingtonIL

Gone!

DIY Rolling Pantry / HomeStagingBloomingtonIL

It tucks quite nicely in my little space.

DIY Rolling Pantry / HomeStagingBloomingtonIL

This magnificent contraption holds lots of kitchen stuff, and frees up my “real” pantry for my most often used items.

DIY Rolling Pantry / HomeStagingBloomingtonIL

DIY Rolling Pantry / HomestagingBloomingtonIL

Toddler alert! Although I love this idea, it wouldn’t be a safe storage solution if you have toddlers who could possibly pull the unit out and tip it over. I placed my handle out of reach, and it would take a pretty strong child to pull this out of its resting place, but best to rule on the side of caution.

I had originally planned to insert wooden dowels a few inches above each shelf to keep items from falling off as was shown in the original post, but I decided it wasn’t necessary.

As far as cost goes, the MDF plywood was $27.00. The rest of the supplies were either garage sale bargains or leftovers from other projects. I got a lot of bang for my buck on this one!

For other kitchen storage ideas, visit my posts, “Creative Kitchen Storage for Pot Lids“, “How to Build a Simple Kitchen Cabinet for Open Display” and “Organize My Kitchen Pantry With What?!“.

This post was written by Tracy Evans who is a Certified Home Stager, Certified Redesigner and Journeyman Painter servicing the Central Illinois area. Feel free to visit her website at www.HelpAtHomeStaging.com to view her portfolio for more before and after pictures of her projects. And if you enjoy gardening, you may want to visit her gardening blog at MyUrbanGardenOasis.