There’s something to be said for the ease of open shelving. It’s almost soothing to be able to see the familiar dishes you love, displayed in such a relaxed way. And I can vouch for the fact that storing dishes on open shelving makes unloading the dishwasher a smidge less painful. Just a smidge.
In a mini-makeover of my kitchen, I chose to fill two separate areas with open shelving. Not only are those areas now more visually appealing and more functional than if I had installed cabinetry, but they were also a less expensive option. One of the areas was done using corbels I made from scratch. Here’s the result.

Prior to this project, I’d been collecting photos of corbels from Pinterest that I thought I might be able to duplicate. One blogger’s corbels in particular, (Pretty Handy Girl) were an immediate favorite. And God Bless her for providing a pattern on her site. I stretched and altered her pattern to fit the dimensions I needed with the help of my genius son Ross, and “Snipping Tool” on my computer.

I used graphite paper to transfer the pattern onto wood. Graphite paper resembles black tissue-paper, but has graphite on one side. I placed it between the pattern and the wood, and then traced over it with a painting stylus to transfer the design. (I had two different patterns going on here in the next few photos for those of you who are super-observant.)

Here are the patterns traced onto the wood pieces. I used 1″ stock from my stash for the thinner, more intricate side pieces, and 2″ stock for the thicker, simpler center piece. My 2″ stock was reclaimed wood (aka found on a curb).

Here are the pieces cut around the perimeters.

I have a scroll saw that I use for intricate inside cuts like these, but I don’t see why this couldn’t be accomplished with a jig saw using a very thin blade.
Regardless of the saw, holes need to be drilled in the wood pieces for the interior cuts. I drilled a hole near each area where I would have to switch blade direction. You can’t drill too many holes! If you don’t drill enough holes, it will be painfully obvious that you needed more when you’ve run your blade into a spot that you can’t wiggle your way out of—sort of like painting yourself into a corner.


Now we’re getting somewhere.


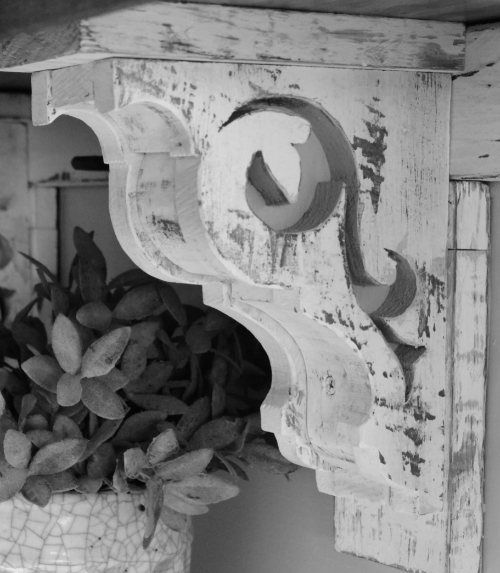
Since I had decided on three shelves, with the bottom shelf being smaller in depth than the top two, I decided to make the corbels different too. I designed the next set of corbels by melding a few different lovelies that I’d seen and liked, and I followed the same steps with those.


Since I wanted the corbels to look old, I distressed them. Step one is to rough up the wood. Make sure you’ve done enough of that before you stain because if you do any heavy distressing after you stain, the fresh, unstained wood will show through on the sanded areas.
Light-colored wood peeking through your paint would be a dead giveaway that the corbels aren’t authentic. So not only would you be discovered (*blush*), but you would also have to break out the stain again, and touch up your “tip-off” spots. The stain should dry several hours or overnight before painting.

I also cut and stained pieces to put underneath and on top of the corbels.

I then glued and nailed the main corbel pieces together. I only used one nail on each side, setting the nails with a punch. Since these are supposed to be old pieces, I chose not to fill the nail holes.


I randomly brushed some gray and some blue paint on the pieces because those were colors I wanted to show through the finish paint. They’re not all that attractive at this stage of the game.

I put a coat of white paint on next.

Since I wanted these to look like they had several layers of paint, I added some joint compound and after it was completely dry, I added another coat of white paint.


After letting the white paint dry overnight, I scraped some of the paint back off with the help of a heat gun. If you don’t let the paint dry enough, you’ll end up just smearing the paint as it melts rather than scraping it off as it softens.
I learned that the hard way so you don’t have to. Once you’ve smeared the paint by doing it too soon, you’re not going to be able to get back down to the stained wood because the wood absorbs the soft, melted mess that was once paint, and your stain will be forever buried.


Now for the install. After much deliberation, and a consultation with my super-smart carpenter brother, Mike, I conceded to the use of cleats. The studs were nowhere near where I needed them to be in order to install the corbels into them, so my only alternative was to screw cleats into the studs. Since these shelves were being installed in a corner, I took my cleats onto the adjacent wall for added stability.
I didn’t want to use cleats originally, but once I got them up, I was glad I did. Not only was it a piece-of-mind issue not having to worry about dishes and bottles of red wine and olive oil crashing to the floor, but cleats also fit the old cottage-style I love.


As always, I’m not suggesting this is the best way or the only way to do this, but it worked well for me. As of this writing, my shelves are still attached to the wall—a rousing success in my mind.
After attaching the cleats to the studs, I screwed the back pieces that sit behind the corbels to the wall, and screwed the corbel into the back piece. After using my Kreg Jig to make pocket holes in the tops of the corbels, I screwed the corbels into the cleats through pocket holes. These steps support the downward weight of the shelves.


I then made more pocket holes in the pieces that went on top of the corbels and screwed those into the cleats as well. Physics told me that attaching these pieces would prevent the corbels from tipping forward under the weight of objects placed in the area farthest from the wall.


Next, I added the shelves and screwed them from above into the cleats. The shelves were also curb finds, and the stain color was perfect.

I had to purchase some wood trim to cover up the edges of my shelves. As you can see in the next photo, the ends were pretty rough. The side trim I added was wider than the thickness of the shelves which made them look a little more substantial. See the difference?


I decided to hang the cutting board my son, Brandon, made for me years ago, between the two bottom corbels. I use it all the time, and hanging it here makes it easy to grab and keeps it off the counter. This photo was taken before I painted the walls.

Here’s what this corner of the kitchen looked like before. The blind cabinet to the right of the microwave had a door opening that was only 7″ wide. Not only was it hard to retrieve items stored back in the blind area, but its slim opening wouldn’t allow much to fit inside.
The blind cabinet with the 7″ opening was replaced with a 15″ wide cabinet that extends all the way to the ceiling, allowing for a lot more storage space. This left me with a 12″ space in the corner, and I felt open shelving was a lovely (and pretty much the only) option for this awkward space.

Here’s what the same corner looks like now. Once I decided on a paint color for my kitchen, I painted the cut-outs of the bottom set of corbels with the wall color.

These “after” photos were taken with a new camera that was a gift from my daughter, Sophie. Thank you, Sophie! I love, love, love my babies (even more than my shelves).

As you can see, the shelves tuck back beside the adjacent cabinet. It’s usable space now, and is accessible where it wasn’t before.


I love these shelves being next to the bright, sunny window.

So to recap, this project cost me around $15 for the whole sha-bang. I bought the trim pieces to trim out the ends of the shelving, and a 1 x 12 for the larger corbels. The rest was made with scrap wood I had on hand, or with some trash-turned-treasure wood that I found and rescued. The cabinets I removed were used in my laundry room remodel, so nothing was wasted. Now all of my kitchen space is accessible, and I’m a very happy girl!
This post was written by Tracy Evans who is a Journeyman Painter and Certified Home Stager /Redesigner. If you enjoy gardening, you may want to visit her gardening blog at MyUrbanGardenOasis.


This one overwhelmed me. No way would I or could I do this, but it is gorgeous!!!
LikeLike
Thank you, Marsha. And I would have to disagree–I have a feeling you could do this. You’re very resourceful and I’ve seen your house!
LikeLike
Is there any way u could e-mail me the traceable patterns for both if there’s corbels ?
LikeLike
[…] I was then left with a 12″ space next to the cabinet to the right of the microwave that I filled with more open shelving. I made some corbels from scratch to support the shelves. The actual shelves were from the same curbside wood I used to make the counter top on the other side of the kitchen. It tied the two areas together nicely. See how I made the corbels and installed the shelving here. […]
LikeLike
The shelves look great! Do you have a template of the corbel for the top and middle shelf that you could share?
LikeLike
Great corbels! Would you be willing to share the pattern for the top- and middle-shelf corbel?
LikeLike
This is a great idea. This explained how I need to add the cleats, and how to attach the corbels. Thank you so much
LikeLike
You are so welcome! Glad to help!
LikeLike
I love these and you inspired me so I bought myself a scroll saw. Do you have a pattern for the upper corbels too?
Thanks
LikeLike
I’m so happy for you! You’ll love your scroll saw, and I’m sure you’ll find all kinds of projects that you can use it for. I don’t send out my patterns, but the upper corbel was easy to make. I simply drew out the top of the upper corbel on a piece of paper, using the corner of the paper for the right angle. Then I simply drew around objects to complete the rest. I used a dinner plate for the larger round part, a small juice glass for the curve at the top tip and a tube of chapstick for the small scallops! Then I free-handed what was left. It’s pretty easy to come up with a design. I’m confident you can do it! Good luck!
LikeLike
[…] under cabinets like Love of Family and Home beautiful hood corbels blogged by Home Bunch Corbels added to a shelf above the range by Litchfield Cabinetry is just stunning! How about these shelf corbels by Home Staging in Bloomington Illinois?! […]
LikeLike