
Calling all DIY’ers and decorators! Check out this project that can be completed with basic tools and basic carpentry skills. The wall frame wainscoting I installed in my entryway and my dining nook is easy to do, and I hope you’ll consider trying it if it’s a look you like. So far, it’s my all-time favorite project!
Although I love my home, it’s “ordinary” and in need of some architectural details to add some interest. I decorate my house for me–to suit my taste–but before any project I attempt, my subconscious always whispers, “What if you had to sell your home tomorrow? Is this project tasteful, and would most people enjoy the change you’re about to make?” Words to live by in my way of thinking, because we never truly know what the future’s going to bring. The fact of the matter is someday my house will be sold, even if it’s not until I’m six feet under. Some person will have to sell it, which means another person will have to desire it. And I want that to be an easy process for the seller, whoever that may be.
If I were going to sell my home, it goes without saying that I will have a leg up on the competition if my home is more interesting than the house down the street. A little extra “oomph” is crucial since I live in a neighborhood where all the homes sort of mesh together, and any potential homebuyers who are looking at my neighbor’s property are likely going to be looking at mine. Our neighborhood houses mesh together so much, in fact, that a relative of mine actually walked into a neighbor’s house thinking it was mine. Oops. Time for some curb appeal too, I guess!
How would my house appear to a seller if it were empty? In that vacant worse-case scenario, flooring, paint, light fixtures, door hardware, appliances, faucets and architectural details become paramount because outside of the major bones, that’s all the buyer has to look at. Those details are going to create that “desire” I mentioned earlier. Updating many of those items is something homeowners can handle on their own, and that’s why this homeowner always has a project going! So let’s get to it.
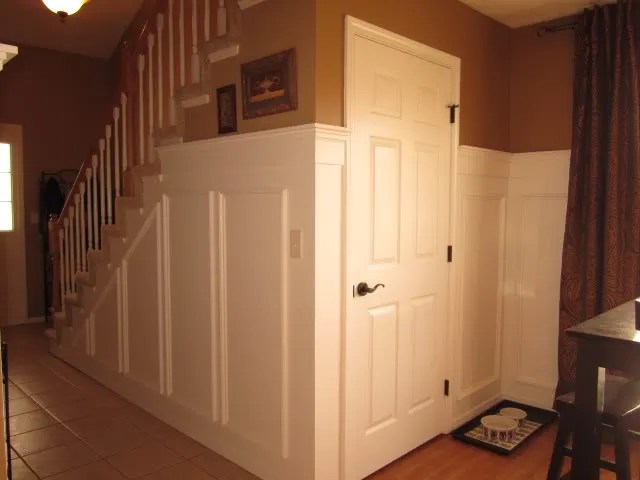
Since I didn’t think to take photos until right after I started this project, you’ll notice a partial piece of the plate rail is installed in a couple of the before photos. You’ll have to use your imagination to erase that, but here are my before pictures.


I can run a nail gun with the best of ’em, but I don’t own one, and decided not to pester my “go to” neighbors, George and Deb, to borrow theirs. Especially since it was just a week ago that I returned their palm sander. Not only do I not want my neighbors to start locking their door when they see me coming, but I also want to demonstrate what can be accomplished with minimal tools as well as minimal skills. I did this wainscoting project with a tape measure, hammer, nails, punch, level, caulk gun, stud finder and a pencil. The only power tool I used besides a drill was a miter saw–more details about a substitute later. If you don’t own a drill, whoever you are, you need one. Buy one. You’ll use it someday, I promise.
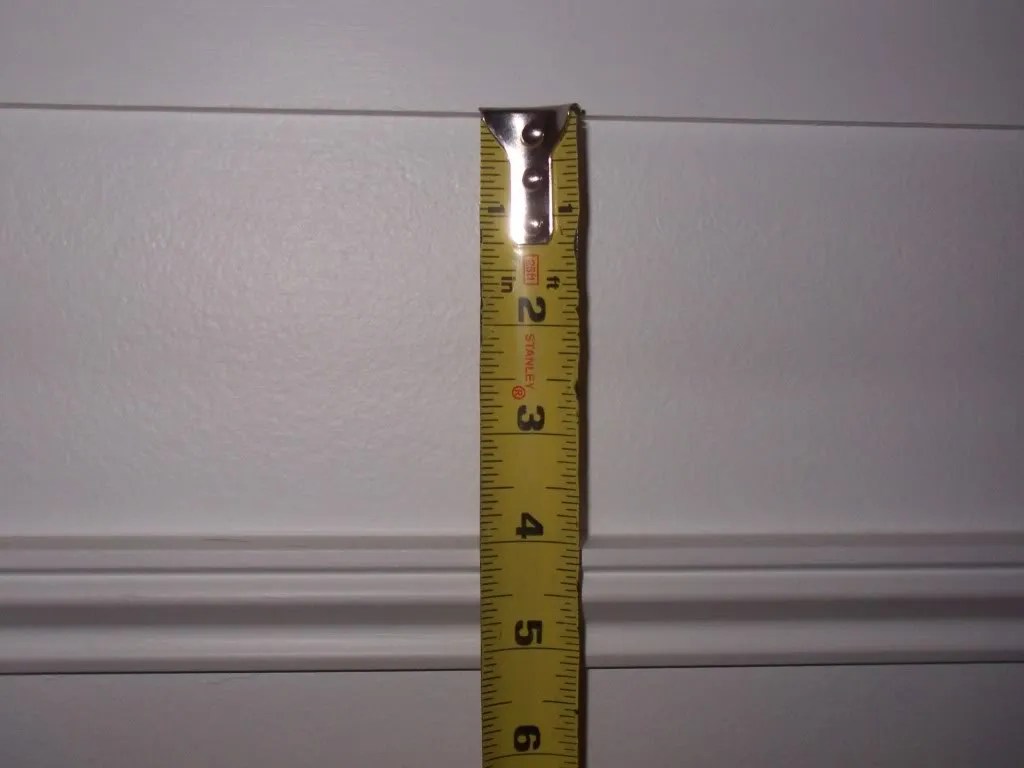
So first I need to decide how high I want to place the plate rail. Mine is a plate rail as opposed to a chair rail since it has a ledge. Installation height is an easy decision for me as I love the look of the rail placed higher than the standard 36″. Mine is 64.5” from the floor. I use this height because this is where one of the panel rows on my six-panel doors hits. It’s appealing to me visually because the top of the plate rail and the row of panels in the door form a continuous straight line. See how it all lines up?

I’ve heard people say they’re afraid to raise a chair rail because it will make the ceiling appear lower. That is not the case in my opinion. It draws your eye up the wall and visually raises it, just as your ceilings seem higher when you raise your curtain rods to within a few inches of the ceiling. Regardless, the wainscoting adds some needed personality to the area. Also, in my situation, if I put a chair rail at 36ish inches, my table would block most of it in my dining nook. If you’re wondering if wall frame wainscoting is too formal for your home, trust me, it won’t be. Although it is often seen in formal rooms, how you decorate around it will determine the level of formality.
The difficult part of this project is deciding how to construct the plate rail since there are many shapes of trims and moldings, made out of different types of materials. I experiment here with a few different kinds until I decide on a combination I like. Here are pictures of the winners.


The widest part of the chair rail, and the board to be installed first is a type of MDF (medium density fiberboard) or something similar. It was purchased at my local Habitat Restore, and repurposed so I’m not exactly sure of its composition, but it’s not wood. It feels like wood, sands well and paints up beautifully, and that’s what’s important. It’s actually called “buttboard” (Quite the name, right?), and it was a bargain at only fifty cents per board. It only came in four-foot sections, but since most of my areas are less than four-foot, I decide to use it. If I had long expanses of wall, I would choose something that comes in longer lengths. It measures 6” by 3/8” thick (actual measurements). Here’s a picture of the buttboard.


First I use a level, and mark the wall so I know where to place the butt board. I mark where the studs are as well. I nail it up being sure to stay off the studs, and placing the nails high enough on my board so that the next two pieces of trim will cover them. This way, I don’t have to fill any holes. If I nail into the studs, there’s a chance of hitting those same nails when I install the trim on top of the buttboard. Hitting a nail with another nail is never a good thing.
The second and third pieces to go up are pieces of trim that are installed on the face of the buttboard. These are the pieces that need to be nailed into the studs. So these nails go thru the molding, thru the buttboard and into a stud. The two pieces of trim being used for the plate rail are made of vinyl. Here’s a picture of how all three plate rail pieces are put together.


Side note—I used to own one of those fancy-shmancy stud finders that runs on batteries. According to the one I had, my whole house was either one giant stud or it didn’t have any studs. (Couldn’t have been operator error.) So if you need to purchase a stud finder on a budget, here’s a suggestion. I’m sure this stud finder isn’t very expensive. I’ve had it for so long that I don’t remember where I bought it, and hopefully someone still makes them. I’ve used it, abused it, lost it, found it, dropped it, broke it and glued it back together.
It has a magnet in it, and you just run it across the wall, and it finds the drywall nails/screws. You can see the yellow lever move when it locates a screw which tells you where your studs are, and you can feel it pull when you run across them. Keep in mind, it won’t help you locate water pipes or ductwork—just the nails and screws. In many homes, if you look closely, you can see where the screws are located without even using a stud finder since homes shift and move and force them out to form “nail pops” or little raised areas in your drywall. So here’s a picture of my magical stud finder. I love this thing! Simple yet effective. If you’re a carpenter and are reading this, I’ll bet you’re either laughing or rolling your eyes. Laugh if you must, but I’m committed to my stud finder.

I’ve never used vinyl molding before for a project like this, and I love it. It doesn’t splinter, it cuts and drills well, and although I will still prime and paint it, it’s already white for me! It’s also less expensive than other materials.
Since I’m not a carpenter, and I know my limitations with a hammer, I pre-drill all my holes in the trim to save myself a migraine. I don’t want to find out if the vinyl will split without pre-drilling. I also don’t want to experience the inevitable each and every time I use a hammer. The inevitable would be bending a nail on the last hit, and trying to dig it out of the wood without losing my charming personality and whizzing the hammer through a window.
Tip: It’s a good idea to drill the holes on the curved part of the molding because they’ll be less noticeable in that area. I make sure the pilot holes are slightly smaller than the nails I’m using, and I countersink all my nails with a punch. I slightly overfill the nail holes with spackle, and sand them smooth.


If you’ve read my other posts, you know I’m a garage sale addict, and my power miter saw is yet another of my earth-shattering finds. Before I invested in a power miter saw, I used a miter box for this type of project and it worked just fine. My miter box was also purchased at a garage sale (surprise!), and was still in the box when I bought it. It still had the Menard’s sticker on it too in case you’re wondering where one can be purchased. I also saw a miter box recently at our local Habitat Restore. My garage sale miter saw was probably purchased for a husband for Father’s Day by a wife with an ulterior motive. “Honey! Look what the kids and I got you for Father’s Day! (Pause.) Remember that trim that needs to be replaced in the bathroom?” Even purchased new in a store (in case you’re not a garage sale addict), a miter box is a small investment, and the cuts they make are very accurate. Isn’t she a beauty?!

You’ll most definitely need something that cuts a precise 45 degree angle in order to do this project, so maybe you could borrow a saw from a friend if you don’t have one and don’t want to invest in a miter box. Although a jig saw can be set to cut a 45, it wouldn’t be accurate enough to use for this project. I need to cut 45’s on the plate rail trim were where it extends around outside corners as well as on the inside corners. And there are many, many 45’s to come on the wall frames too! Here’s the plate rail completed.

At this time, I break out the halogen light, and shine it on the walls so all the nicks and dings show up easily. I spackle all of these too and then sand all the patches smooth. I really want the walls to be perfect because we’re doing “fake” wainscoting. The proper way to do wainscoting would be to apply sheets of paneling to the walls before you apply your frames, but the look is the same whether you add paneling or not. All the baseboard would have to be removed too, so I don’t see the point in going to the work and the expense of adding it. Here are my polka-dot walls after patching.

I have seen where some people who have an even higher degree of OCD than myself, will sand the walls smooth with a palm sander before they prime to make them really smooth. I choose not to, but do what’s right for you. When I paint my walls, I’m going to be adding some degree of texture right back onto them so that’s why I see sanding the walls as futile.
I prime the plate rail and the wall, including the vinyl trim, even though it’s already white. I want the trim to match the white I’ve chosen for the rest of the project, so I need to put finish paint on it. The finish paint will stick to the vinyl better if I prime it first. Here’s the wall and trim primed. I love it even at this early stage!


After the primer dries, I caulk every area where two boards meet one another, and everywhere boards meet the wall. Since I’ll be caulking several areas, I choose not to use any type of glue or liquid nails to hold my molding on the wall. I’ve done this before and don’t feel it’s necessary to glue the boards since nailing and caulking around them will hold them in place. And what if someday I want to remove my beloved trim?
So on my plate rail, I caulk against the wall on the top, between the top flat piece and the trim, between the trim and the butt board and between the butt board and the wall. There’s lots of caulking. If you’ve never caulked before, you’ll certainly have the hang of it by the time you finish your wall frames. Tip: Be sure to caulk after you prime so the caulk will adhere better to the vinyl.


Caulking takes practice. If you haven’t done it before and have trouble, don’t be discouraged. For the best results, I would cut a very small hole at a 45 degree angle in the nozzle. That alone will save you some grief. If you cut the hole too big, you’ll be up to your elbows in caulk, and you can’t make the hole smaller once the deed has been done.
Hold the gun at about 45 degrees, and go slow so the caulk has a chance to grab onto to the surface, while trying to keep the caulk gun moving and at an even speed. Try to keep an even “squeeze” on the trigger to keep the bead consistent. Here’s how small I cut my hole.

As soon as you finish a section, immediately smooth the bead with a wet finger. Caulk sets up very quickly so you have to work fast. Once you get it nice and smooth, leave it alone. Walk away. Resist the urge to smooth it out one more time. Control yourself or you’ll live to regret it.
If you apply the caulk too heavily, you will have a nasty, huge mess on your hands–literally. I would keep a damp rag handy to wipe off any excess if you get too carried away, and be sure to wipe the caulk off before it starts to set up or you’ll have a brand new issue.
Practice, practice, practice. People who are proficient at caulking make it look easy, and it is–once you’ve had a little practice. I would recommend using white caulk as opposed to clear. Clear caulk is a thinner consistency, it doesn’t set up as quickly, and in my opinion it shrinks more than colored caulk. I try not to use clear unless I really must have clear for some reason.
Tip: Make sure the caulk you choose is water clean-up and is paintable.
Once the caulk has set up, I apply my first coat of finish paint. I use Sherwin Williams’ “pure white” in an eggshell. It’s immensely easier to paint my walls before applying the wall frames so it makes sense to at least get the first coat on ahead of time. The second and final coat of finish paint will go on after the wall frames. I decide to take a break for a couple of days after the first coat of finish. Here’s a picture after priming and after the first coat of finish paint and before adding the frames.

Now I give my walls some personality! The most difficult part is trying to decide where to place the frames and how big to make them. I did some research into frame placement, and it can vary just as a chair rail height can vary. The consensus seems to be that the box sizes can vary based on the particulars of your room. As long as the spaces in between your frames are consistent, everything will appear consistent even if you must have different sized frames on the same wall due to windows or other obstacles. The most common measurement seems to be 3″ in between frames and 4″ between the top of the baseboard and the bottom of the frame. Also, 4″ between the top of the frame and the bottom of the chair rail were most common. Those are the measurements I’m going with.

The space in the above photo is actually 3″, but the camera angle has distorted the measurement.

Since my entryway is broken into different sized wall spaces by doors, most of my frames are going to be different sizes. Also, since I have small areas, the calculating is pretty simple. Because it’s a rather small area overall, I go with bigger boxes rather than smaller ones so it doesn’t busy up the space. In other words, if in a particular section I’m trying to decide between two boxes or three, I go with two. I have four total doors breaking up the area and six rectangular squares on each of those doors. If I went with smaller frames, that would be a lot of little rectangles fighting for visual attention, sending my eyes into a geometric frenzy.
The trim I choose for the wall frames is pre-primed MDF as opposed to vinyl simply because I can’t find a shape I like in vinyl. (I have since found some I like in vinyl. Go figure.) All my trim is purchased at our local Menard’s. I still have the tag from Menards on the back of the trim I’m using for the frames, and there are two numbers listed. One is #8595 and the other is #43559 08595. Here’s what the wall frame molding looks like.


I found on a few websites that some carpenters construct their frames ahead of time, and then attach them to the walls. I fail to see the advantage of doing it that way since I would have to have to create a jig, and have to drive the nails into the frames without destroying them—especially since I’m refusing to pester George and Deb for their nail gun. I don’t have that level of skill so I’m going to do it the “lay-person” way. The finished product will look the same—amazing.
So step one for attaching the frames is to make small pencil marks (don’t use ink, it’ll bleed through your paint) where the top piece of trim needs to go. Remember when your Mom and Dad told you to pay attention in math class because you would need that knowledge later in life? They were right, and now is later. I need to measure, and mark my spacing so I know where to put both ends of the top trim pieces, and then make a mark 4” down from the bottom of my plate rail so I know at what height to place them. You should only have three pencil marks for each entire frame—all on that top piece of molding.
No need to make marks lower down for the side pieces or mark the bottom piece since the location of the three remaining pieces is determined by the placement of the top trim piece. Once the top piece is placed perfectly level in its marked location, installing the remaining three is a walk in the park!
Next, I measure and cut my pieces to length–all at 45 degree angles. We’ve all heard “measure twice, cut once”, and that phrase takes on a whole new meaning in this project. If I have two or three boxes in a section, I make sure all the top and bottom pieces for all the boxes are cut exactly the same length, and all the side pieces are cut exactly the same length. I choose to cut my frames one wall section at a time, install them and then go on to the next section so there’s no chance in getting any of the trim pieces mixed up.
After all the pieces are cut, I pre-drill two pilot holes in both the top and bottom pieces about two inches or so from the ends. I drill three pilot holes in the longer side pieces–one in the center and the other two a couple of inches from each end. Again I make certain my pilot holes are slightly smaller than my nail size so the nails will grip the wood. I decide to tap the nails part way into my pilot holes before I put them up to the wall for installation so I don’t have to juggle the trim piece, a hammer, nails and a level. Some of the following pictures are recreated using leftover trim, so the molding pieces are smaller than the ones I actually used, but the process is the same. Here’s my cut trim with my nails standing at attention and ready to roll.

It’s important to start with the top piece, so if any “fudging” has to be done, it can be done on the bottom pieces that aren’t as visible. I line up my first trim piece with my marks, and using a level, tack in the two nails. I don’t put my nails in all the way until I have all the frames in a section completely up, just in case of “installer error”. (Another possible whizzing-hammer situation.)
Again, I’m not a believer in using glue or liquid nails in addition to the trim nails I’m using because the frames will be caulked around when I’m finished. The caulk will serve as my “glue”. Also, since I’m caulking, there’s no need to worry about hitting a stud for the frames. They are quite secure with nails and caulk. Here’s a picture of my top piece tacked up, and a picture of the trim nails I used that I purchased at a garage sale. Be honest. It makes you want to go to garage sales, doesn’t it? They’re a bit rusty, but since I’m just using them for trim as opposed to bridge building, they’ll work just fine.


I have a spot in one wall that bows out so I have to scribe my top and bottom pieces to make them fit. To be more specific, when I hold my trim so that the center of the trim touches the wall, the end pieces stick out from the wall and won’t lay flat. In the interest of time, I’ll refer you to google to learn how to scribe a piece of wood, in case you run across this situation. It works like a charm. Tip: I would recommend using a compass for the sake of precision. It’s the most accurate way in my opinion.
In the event you have an area where your wall is concave on the other hand, just tack your piece up by nailing into the two pre-drilled end pilot holes, and the remaining gap in the center can be filled with caulk.
So after I have my top piece tacked up, I use my level, and hold up a side piece so that it’s plumb and meets exactly at the top where the corners meet. I tack it up with only one nail in the center of the piece of trim so that the ends move freely. After constructing these frames different ways, I find that tacking the side pieces only in the centers is the best way to begin installing those, and you’ll see why in a minute. Here’s a picture of my side pieces tacked only at the center.


So what I have now is the top piece tacked on both ends so it’s secure, and then the two side pieces only tacked in the center. Now it’s time to match up the side pieces at the top corners and tack nails into the top pilot holes. It’s easy to be precise with matching these corners because the side pieces are tacked in only at the center, and you can move the top of the side piece freely in order to make a perfect corner.

If you’ve been precise with the previous instructions, the bottom piece should go in easily by matching the corners and tacking nails in the final four pilot holes. If you have to fudge the bottom piece to make it fit, that’s ok. It would have to be pretty messed up to be spotted that close to the floor. The key is to cut all the corresponding trim pieces exactly the same length, and then installing them perfectly level and plumb. And of course you must have perfect 45 degree angles. It’s really not that difficult if you take your time. Here’s my frame with all the nails only tacked in.

Once I finish a wall section, I hammer the nails in all the way, countersink them with a punch and repeat the process in each section until I’m finished. It doesn’t look finished until I caulk around both the inside of the frame as well as the outside of the frame. I think it looks nice to also push some caulk into the joints where my corners meet, even though the cracks aren’t very wide. I use a cotton swab to remove any globs of caulk that gather in the groove that my fingers are too big to fit into. I also need to fill of all of those unsightly nail holes. I wait until I have all the frames done before I fill holes and caulk. I remember to spackle, let dry and sand before I caulk so I don’t disturb my caulk during sanding.


Although I’ve already primed and put a coat of finish on my masterpiece, I’ll need to suck it up and get out the primer all over again, and prime over all my newly sanded spackled areas. If I don’t prime over the spackled areas, I’ll look at my project when the light hits it, and be able to see each and every spackled spot through the finish paint.
Once the primer is dry, I need to hit the primed areas with finish paint again too in order to get those spots “caught up” to the rest of the walls. Remember the rest of my walls already have one coat of finish on them. After that dries, I can repaint my entire project.
I will admit that painting the final coat of finish, for me, is the worst part of the project, and I paint for a living. It’s no fun to paint around all those boxes. I just put on some James Taylor, and sing myself through the pain. It’s more tolerable if my mind is in the right place so I concentrate on how beautiful it’ll be when I’m done. I use a brush to paint the frames, and use a small roller to finish the remainder.
For the impact this adds to my home, I think it’s relatively easy and inexpensive to do. I saved myself some money by calculating my frame sizes and cutting my pieces so that I didn’t have much waste. I found that by adjusting my measurements by an inch or so, I saved a lot of potentially wasted inches of molding. Here are my before and after pictures.


Wall frame wainscoting adds a sense of elegance to this space and is a classic design addition. It’s like that little black dress that never goes out of style. It adds some formality without feeling stuffy, and I love it!
Note: If you’re a wainscoting lover, and this looks too imitating for your skill level, a wainscoting option that is simpler to install and is just as beautiful is board and batten. If you want to give that a looksee, feel free to check out my post, “Board and Batten for a Small Bathroom“.
This post was written by Tracy Evans, who is a Certified Home Stager, Certified Redesigner, and Journeyman Painter servicing the Bloomington/Normal, IL area. Feel free to visit her website at www.HelpAtHomeStaging.com to view more before and after photos of her projects. And if you’re a fan of gardening, you may want to visit her urban gardening blog at MyUrbanGardenOasis.
For more information about our local Habitat for Humanity Restore here in Central Illinois, please visit their website at ReStore@HabitatMcLean.org. Donate generously!


[…] I marked out my master plan with painter’s tape so I would have an idea of what it would look like first. See how to install wall frame wainscoting here. […]
LikeLike