I am always looking for ways to banish builder basic details in my cookie cutter home. My wood trim is one such detail—that tiny, non-descript, minimalistic stuff. My trim is, in a word, a “snoozefest”. I found a way to beef up my window casings, and here’s how I did it.
I went to my local Menards, and purchased the following boards.
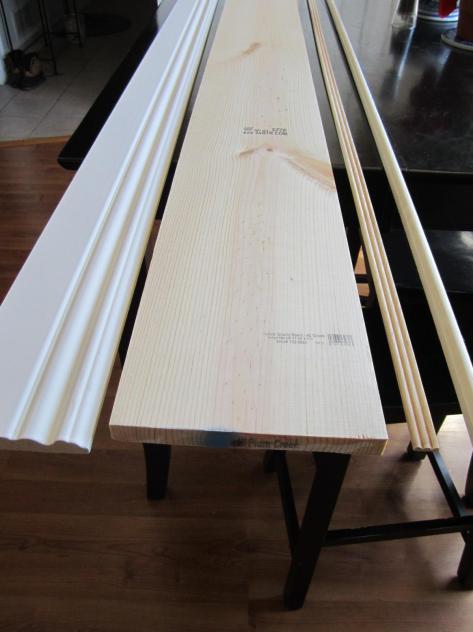
Here’s some side views and the corresponding UPC codes from each board.


This was stamped on the plain pine 1×8 board I bought for this project.

Here’s how I’ll be assembling the pieces after I paint and cut them to size.

Being the frugal person I am, I didn’t want to pay a lot of money to get a top-of-the-line pine board for the main bottom piece for my project. Half of this board will be covered up anyway. I opted for a cheaper grade that has imperfections that I can fix on my own. This is how I fix them.
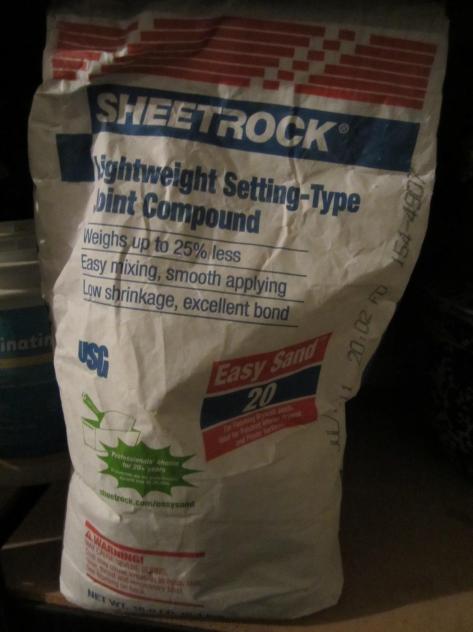
I used to buy small containers of joint compound to keep on hand for my projects. But most of the time, I would open the lid only to find the Sahara Desert. Now I buy Durabond, which is to me, what duck tape and WD-40 are to most home repair geeks. Here’s what the bag looks like. It’s joint compound in powder form that I mix myself, so I can mix only what I need. The number 20 on the front of the bag means it sets up in 20 minutes. You can purchase different numbers, for different drying times. So 20 minutes drying time is much quicker than regular joint compound, and is about right for most projects I do. It also dries harder than joint compound.
I put a small amount in my mud pan. I was told by a drywall finisher that you’re supposed to put water in the pan first, and then add the powder to it, but I’m not sure exactly why. I like to put the powder in first so I don’t have to juggle an elongated pan with water in it. (It’s a coordination issue.)

I mix it with cool water, and I’m good to go. I mix it to about peanut butter consistency. If I mix it thinner, it’ll be harder to work with, and will take longer to dry. If I mix it too thick it’ll be a brick in about 5 minutes.

I spread the mud over all the imperfections in my board such as dings, raised-grain areas and knots. After it dries, with some help from my hair dryer (Who has twenty minutes to watch mud dry?), I sand it smooth with a sanding sponge or sandpaper wrapped around a block of wood, and then my inexpensive board looks just like one that costs twice as much!
You should apply the mud to your board before you prime it, which I didn’t do in this case. A do-as-I-say-not-as-I-do moment.


First, I prime my unprimed pieces of wood and trim as well as the areas that I fixed with joint compound. Then I apply one coat of paint. I think it’s easier to paint the pieces ahead of time, and then finish up with only one coat of paint after they’re installed, but you could paint both coats after installation if that’s what floats your boat.
Now I nail up my 1×8 onto the wall. My board is warped, and bows up on the ends, but never fear. The screen moulding (the tiny piece of trim with ridges) is the piece I bought in anticipation of this problem.
After I trimmed out this window, I also added the same trim to my patio door and over my front door, and I did those differently. Instead of installing the 1×8 separately, I assembled all the long pieces before installing them, and it was easier that way. So keep that in mind if you want to simplify the process.

Next, I assemble the two top trim boards before I install them onto the 1×8 because it’s easier to put them together on a table at tummy height, rather than try to hold them above my head to nail them on. I also have a curtain rod I don’t really want to take down if I don’t have to, which would clearly be in the way of my hammer. Plus, I’m kinda wild with a hammer. I cut the ends of the 1×8 at 90 degrees to the length of my current window casing, and the other three pieces, I cut at 45 degrees because they’re going to wrap around the 1×8.

I attach the assembled piece that’s shown here on my kitchen table (aka workbench) onto the front of the 1×8.

Now I attach the end pieces. (You’ll notice I still have all my fingers after cutting these tiny pieces. Boo-yah!)


Remember how I said the 1×8 was bowed? Now I attach the screen moulding where the 1×8 meets the original casing to cover the crack, and any gap left between the two.


Next I countersink all of my nails with a punch, and then overfill the holes with more mud or spackle. I sand them smooth after they’re completely dry.

It still looks rough with all the cracks and gaps between the boards. What do we do now is caulk. This is where my project goes from “blah” to “ahhhh!”. Caulking makes everything look so much more professional. (If you need caulking pointers, please refer to my post “How to Caulk Your Bathtub“.)
I caulk everywhere one board meets another—including those tiny end pieces. Notice I caulk after I sand all my filled holes. I’ve tried it vice versa, and no matter how careful I think I can be, I always manage to hit my nice, smooth caulk line with the sandpaper. I’ve tried sanding after I’ve caulked before, thinking I could just caulk while the spackle from the nail holes dries, and then sand afterwards. Bad idea.

After the caulk dries, I put on my final coat of paint, and now no more snoozefest!
Here are my before and afters of my kitchen window and my front door.


Here’s my patio door after installing the new trim. No before picture.

This really is a fairly easy project to do, although you’ll need a miter saw. The small pieces could be cut with a miter box, but the piece of baseboard used towards the top won’t fit in a miter box because it would have to be upright to make the cut you need (bevel), and it would extend over the top of the box. A compound miter saw would be the way to go because it cuts bevels as well as 45’s. So if you can beg, borrow or steal one for a couple of hours, you’re good to go! I bought my compound miter saw at a garage sale, of course.
I already had paint, caulk, durabond and finish nails on hand being the DIYer that I am, and the wood cost only about $20.00 per window. A lot of bang for my buck, I’d say. It also amazes me how much it brightens my space. I love darker paint colors, so to have bigger, better, brighter trim up towards the ceiling definitely adds some lightness. And if I may say so, it just looks expensive. Someday, I might expand my baseboard by adding an additional trim piece, and create the same feel near the floor. But for now, I’m just happy to have the windows done!
This post was written by Tracy Evans who is a Certified Home Stager, Certified Redesigner and Journeyman Painter servicing the Central Illinois area. Feel free to visit her website at www.HelpAtHomeStaging.com to view her portfolio for more before and after pictures of her projects. And if you enjoy gardening, you may want to visit her gardening blog at MyUrbanGardenOasis.

