
Are you one of those people who can’t seem to leave well enough alone? Me too! Last year I painted a secretary (not the kind that works in an office) that I found at my local Habitat Restore. It turned out beautifully, but…
If you’re a follower, you may remember these photos.


For those of you who thought to yourself, “I can’t believe that woman actually painted that beautiful piece of furniture”, get ready to be mortified once again. Because now that I’ve painted it and made it look all nice and new, I’ve decided I no longer want it to look nice and new. I’m going to age it to give it more character, and to help the beautiful detail stand out. Ornate details become lost in a sea of black, and glazing won’t help them to stand out because it wouldn’t create enough contrast against the black. I also know that if I don’t like how it turns out, I can just repaint. Paint is a beautiful thing!!
I begin with roughing up the areas that would normally show wear over time—corners, around knobs and any area that protrudes. Here’s the before picture.

Remember, we want the nooks and crannies to show up a little better so I hit those with sandpaper.

Here we are after sanding.

Next, using a cotton swab dipped in stain, I go over the area that I’ve sanded to darken up the color so it doesn’t look so much like I just took a piece of sandpaper to it. It gives the wood underneath a richer color, and hides any scratches that found their way into the surrounding paint.

Here’s the oil stain I already had on hand, and used for this project. I don’t often use oil these days, but since this was in my stash, oil it is! I love the color–red mahogany.

I repeat the same process in other areas.


And since I can’t seem to leave well enough alone, I decide to add some stenciling inside the glassed-in area, and here’s the stencil I’m using. It was purchased at Hobby Lobby for about $5. Or in my case it was free because of a gift card my son got me for Christmas. Sweet! The stenciling will be mostly hidden once I put all my treasures on the shelves, but I still would like to have them anyway.

I use what I call a “chip” brush instead of a stenciling brush in this case because I want the stencil to look blotchy and uneven—like it’s been worn down over time. I use a white acrylic craft paint.
Important tip: the key to a great-looking stencil is using almost no paint on your brush. I put a very small amount of paint on my brush, and then rub it in a circular motion on a piece of paper to remove almost all the paint. I can always add more paint, but if I get too much on my brush, it can seep underneath the stencil and mess up my lines.

First one, done!

There’s a spray glue you can use to hold your stencil to the painting surface. I’ve never tried it, and always just use tape because I’m frugal. Works for me!

I want to fill the whole area with this design, but the stencil’s too wide to use again on each side of the first stencil. I decide to fill the entire back with stenciling because the center stencils are blocked by wood when the door is shut. I tape off part of the stencil with scotch tape to make the design smaller, and flip the stencil upside down so it’ll fit on either side of the middle stencils.

I measure, and make a mark halfway between the end of the stencil and the side of the secretary. Measure twice, paint once! I use a dressmaker’s white chalk pencil so I can see it better on my black paint, and it just wipes off if the paint doesn’t cover it. Then I line up the center of the stencil with my mark, and paint on my new altered stencil. Fits like a glove!


Now I want to further age my stencils by using what we’ll call “dirty” water, which is just paint mixed with a little water to use as a wash. Any brown acrylic craft paint will work for this. I just wash it over the stencil and dab it back off until I get the look I want. Besides making the stencils look aged, washing them tones them down a bit so they aren’t so in-your-face.


I’ve read that to help protect your painted furniture, you can apply a coat of paste wax. It adds depth and richness to the color, and further hides any sandpaper scrapes that are where they aren’t supposed to be. I still need to perfect this process, but the idea is that you wax your furniture just as you would wax your car. Wax onnnnn, wax off. Move over Ralph Machio!
Once you apply the paste wax, if you ever want to repaint, you’ll have to remove the paste wax first, so be warned. Here’s what I used, but this can is several years old. The product is still good as new though.

Before paste wax…


After paste wax…

The after photo doesn’t do the piece justice because of the flash, but here we go anyway. Here are the before and after photos!
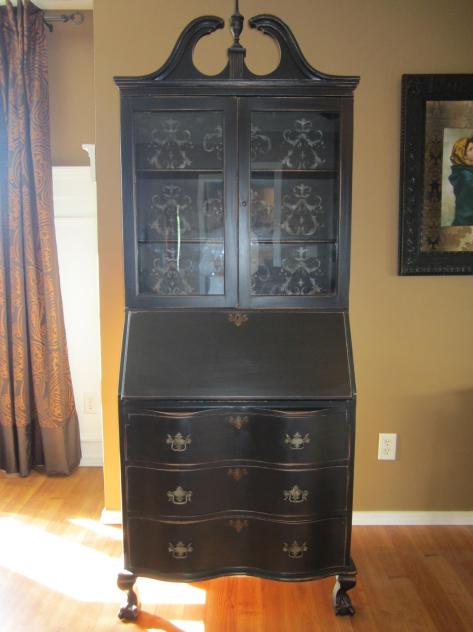

With its new patina, I feel like this piece is a better fit for my home. I believe furniture that looks old is interesting, looks “loved” and has a certain charm. But that’s just me.
Here’s another example of a piece I painted and distressed. Here’s the before picture.

And here are the afters.


Side note: After hours of working on this project, my son Ross told me he couldn’t tell any difference between what my furniture looked like before, and how it looks now that it’s distressed and stenciled. But I’m not discouraged. He wouldn’t notice an elephant having tea on our living room sofa. I love it, and that’s really all that matters! I love you too, Ross (especially since he’s the one who got me the gift card for Christmas).
This post was written by Tracy Evans who is a Certified Home Stager, Certified Redesigner and Journeyman Painter servicing the Central Illinois area. Feel free to visit her website at www.HelpAtHomeStaging.com to view her portfolio for more before and after pictures of her projects. And if you enjoy gardening, you may want to visit her gardening blog at MyUrbanGardenOasis.


Beautiful Tracy! Glad to also see that “Charles” made the cut on the blog! 🙂
I’m also getting great use out of “Catherine.” She’s a beauty too even though she was painted and distressed instead of refinished!
LikeLike
You have vision that I don’t possess.
LikeLike
Not sure it’s a vision, Marsha. That sounds way too profound for what I have. More like a Pottery Barn fetish, I’d say! > Date: Mon, 24 Jun 2013 03:01:28 +0000 > To: tbrsevans@hotmail.com >
LikeLike